QuantiX Labeling Functions
History
The History function reports the transitions between states of indicators. Sometimes, the decision-making depends not only on the current but also on the previous state of an indicator. This function allows you to track the transitions for features. Note that the function works only for features with labels.
The inputs of the function are explained in the table below.
Input | Description |
|---|---|
Timeframes | The timeframes in which the function is applied. |
Feature Name | The name of the feature to which the function is applied. |
Output Column Name(s) | The name of the column in which the result is stored. |
Example
The RSI indicator has three main regions: normal, overbought, and oversold. To track the transitions of RSI states, we use the History function in the following manner:
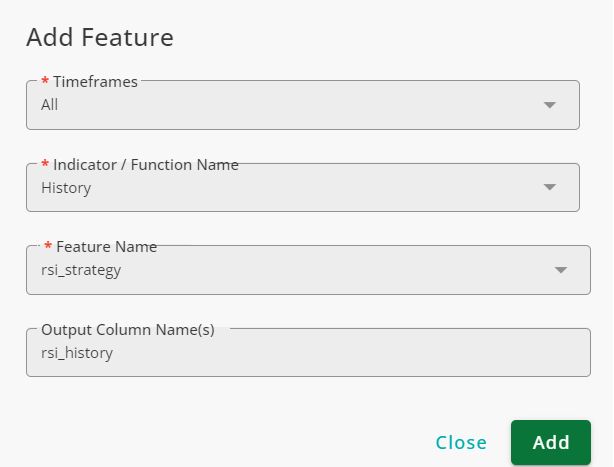
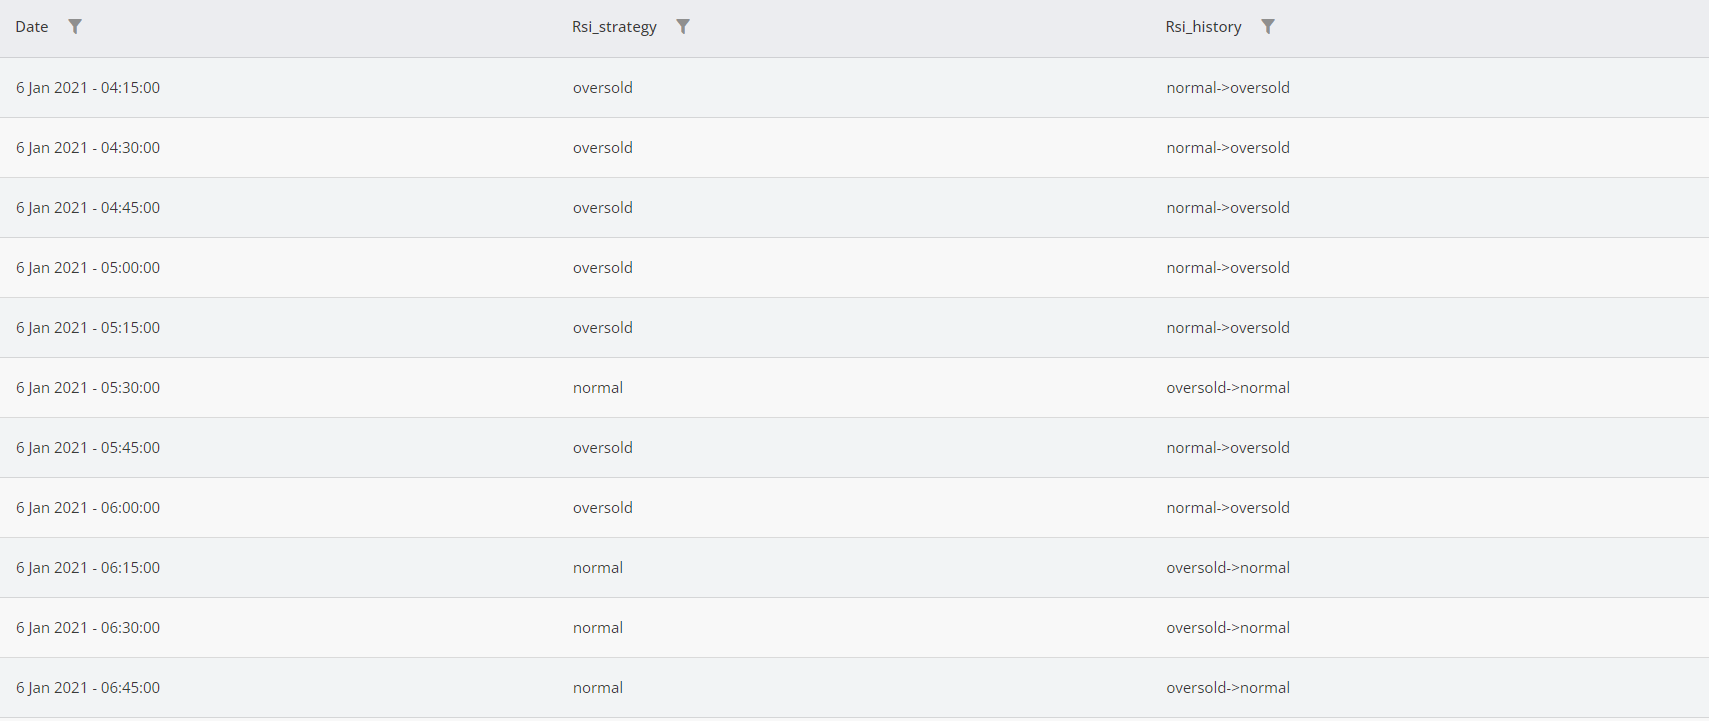
As seen in the figure below, in the 6th row of the table from the top, the state of RSI changes from oversold to normal, and this is reported in the rsi_history column. One candle later, RSI enters the oversold region again, and thus, rsi_history is normal->oversold for the 7th row and remains so until the 9th row, where RSI enters the normal region again, and rsi_history becomes normal->oversold subsequently.
Advanced Position
The Advanced Position function determines the relative position of an indicator or price compared to other indicators and fixed thresholds. It takes a feature and a set of thresholds, dividing the feature's value range into distinct regions. Each candle is then labeled based on the region it falls into.
The inputs of this function are listed in the table below.
Input | Description |
|---|---|
Timeframe(s) | The timeframe(s) in which the function is applied. |
Feature Name | The feature being checked to label candles. |
Thresholds | The thresholds breaking the feature's range into regions; can be fixed values or varying values. |
Interval Names | Names given to the regions; must be equal to the number of thresholds +1. Enter names in reverse order. |
Example
To break RSI into overbought, normal, and oversold, use the Advanced Position, as shown in the figure below. Note that we have 30 and 70 in the Thresholds field, but in the Intervals field, the order of intervals is overbought, normal, and oversold.
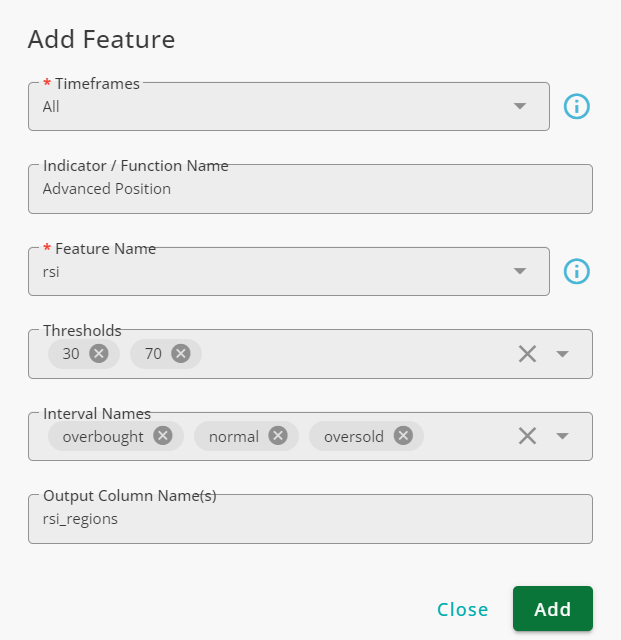
The function breaks RSI range into three regions and labels candles based on RSI values.

Steadiness
The Steadiness function measures how consistently a column maintains the same label over time. In this context, steadiness refers to how long a specific label persists across consecutive candles. The longer a label appears without interruption, the steadier the column is.
This function allows you to define custom steadiness levels, helping you analyze trends and stability in market data.
The inputs of this function are explained in the table below.
Input | Description |
|---|---|
Timeframes | The timeframes in which the function is applied. |
Feature Names | The column(s) that the function evaluates. |
Thresholds | The thresholds that separate different levels of steadiness. |
Steadiness Levels | The names given to different levels of steadiness; enter them in reverse order of the thresholds. |
Output Column Name(s) | The name of the column in which the result will be stored. |
Note that if two or more features are selected in Feature Names, the function evaluates the stability of the label combinations. In this case, any change in the state of a selected feature will affect the function’s output.
Example
The RSI is one of the most popular technical indicators, ranging from 0 to 100. When the RSI is below 30, it is considered oversold. Values between 30 and 70 indicate a normal state, while values above 70 signal an overbought condition.
We define four levels of steadiness based on how long the RSI maintains a specific state:
Not steady: The RSI state changes.
Moderately steady: The RSI remains in the new state for three candles.
Steady: The RSI holds the state for five candles.
Very steady: The RSI maintains the state for seven candles.
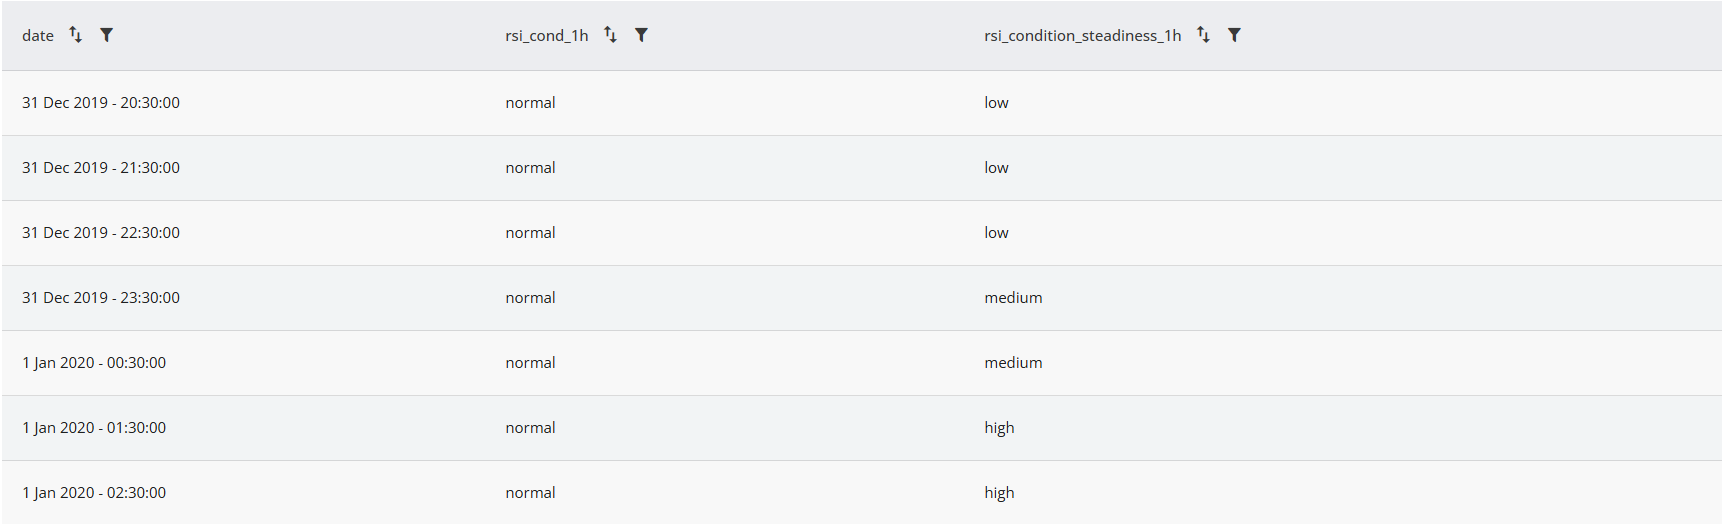
To label candles based on these steadiness levels, we use the Steadiness function, as illustrated in the figure below:
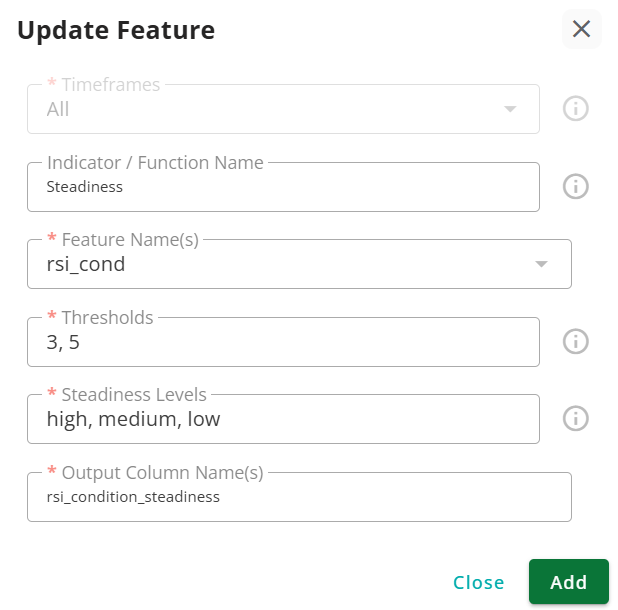
As is seen, the steadiness is not steady at the beginning of the table. After three candles, it becomes moderately steady, and as time passes, the state of the rsi_steadiness column becomes steady and very steady.
Mix
The Mix function takes two or more input columns and creates a new column where labels are assigned based on the states of the input columns.
The inputs of this function are:
Input | Description |
|---|---|
Timeframe(s) | The timeframe(s) in which the function is applied. |
Features | The features used in the function; only columns with labels can be used. |
Mix and Keep Original | The combinations defined here are added to the output column using |
Mix and Rename | Use this list to assign new names to specific combinations. You need to define the combination and its associated label. |
Ignored Combinations Label | Any combination not defined in Mix and Keep Original or Mix and Rename will be assigned the label defined in this field. |
Example
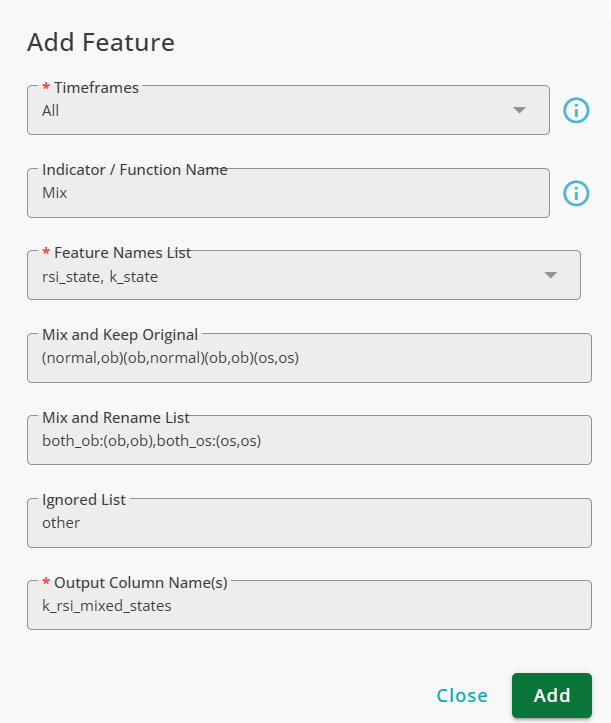
If you want to consolidate the states of both RSI and Stochastic indicators into a single column, you can use the Mix function. Before applying the Mix function, you should first use Advanced Labeling to create the rsi_state and k_state columns, which store the states of RSI and Stochastic, respectively.
When using this function as shown in the figure below:
If both RSI and Stochastic are overbought, the output column is labeled both_ov.
If both RSI and Stochastic are oversold, the output column is labeled both_os.
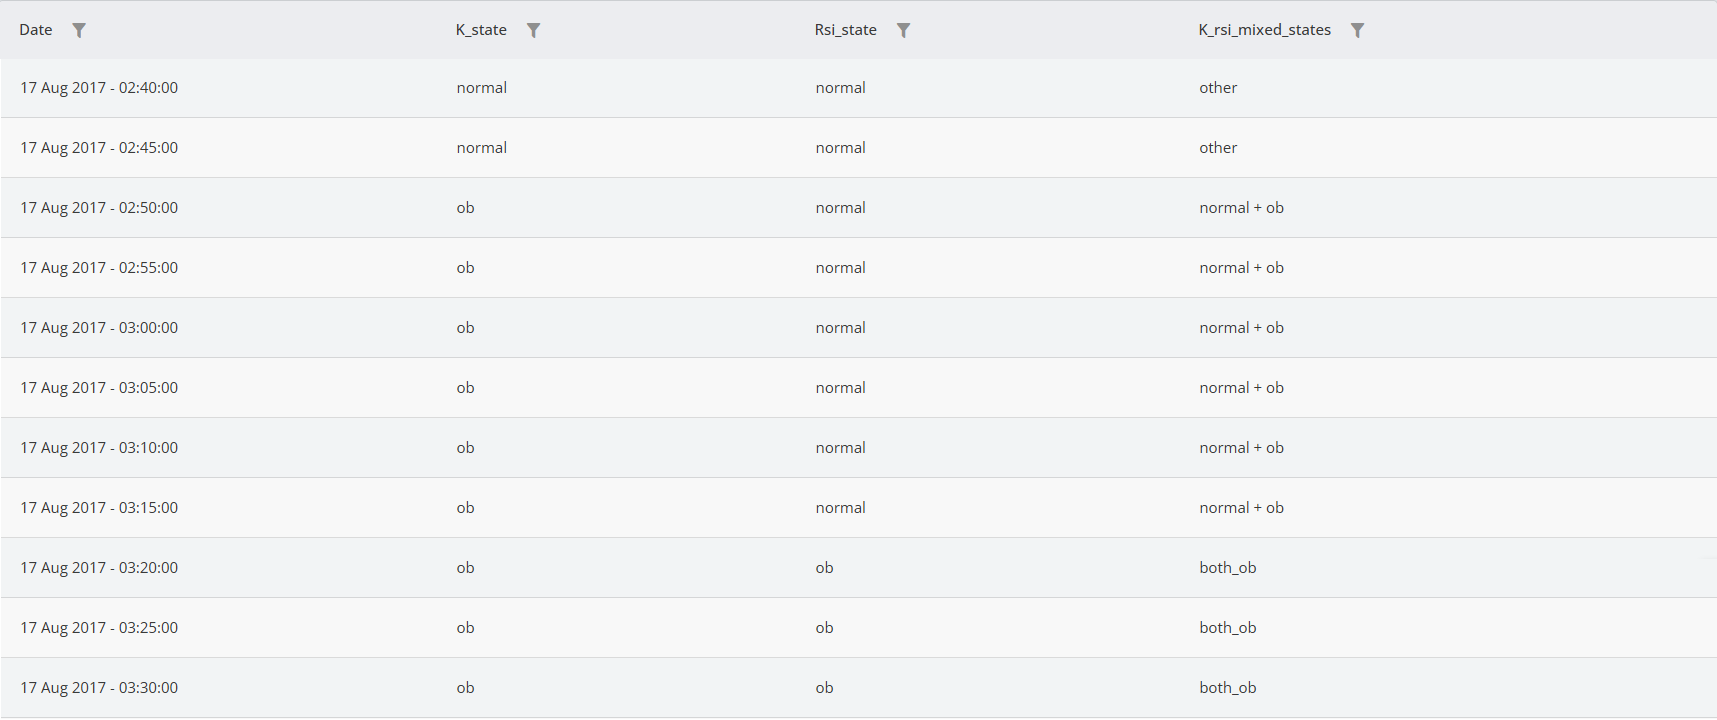
If RSI is normal while Stochastic is overbought, the output column is labeled normal + ob.
If RSI is overbought while Stochastic is normal, the output column is labeled ob + normal.
Any other combination of RSI and Stochastic states is labeled as other.
The outputs of this function is shown below.
Cross
The Cross function checks if two features cross each other or not. The inputs of this function are explained in the table below.
Field | Description |
|---|---|
Timeframes | The timeframes in which the function is applied. |
First Indicator | The first feature used in the analysis. |
Second Indicator | The second feature used in the analysis. |
Output Column Name(s) | The column in which the result is stored. |
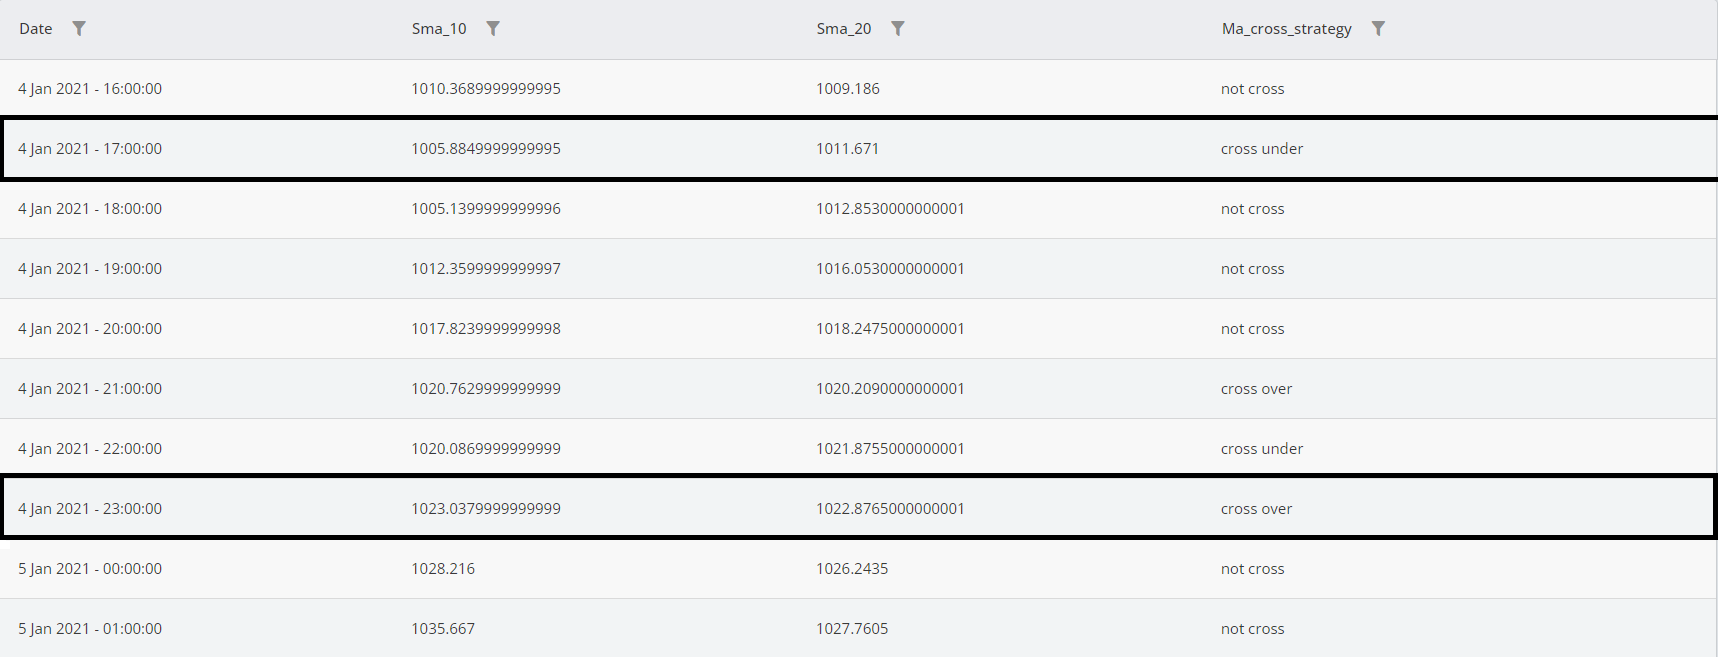
The First Indicator and Second Indicator are the features that the function uses to detect crosses. Note that only numeric columns can be used as inputs for this function. The result column contains three labels:
not cross: The features do not cross each other.
cross over: The first feature becomes larger than the second.
cross under: The second feature becomes larger than the first.
Example
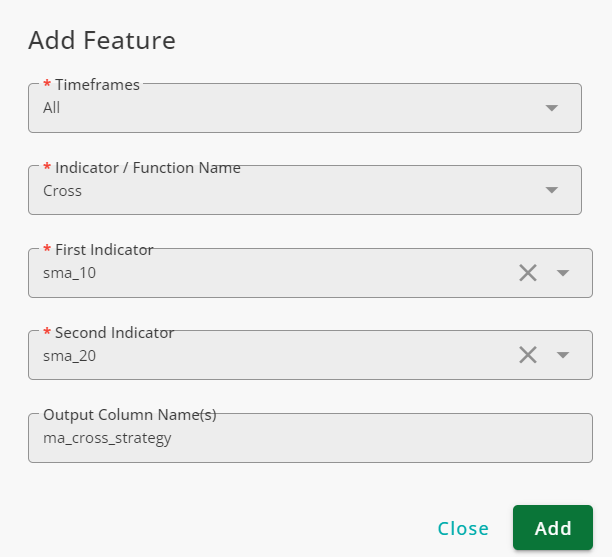
The MA Cross strategy is a popular approach in financial markets, where trades are made based on the crossing points of two moving averages. In this strategy, two moving averages are used: one with a window size of 10 (fast) and another with a window size of 20 (slow).
The buying signal occurs when the fast moving average crosses above the slow moving average.
The selling signal happens when the fast moving average crosses below the slow moving average.
The key aspect of implementing this strategy is identifying the crossing points.
To detect these crosses, we use the Cross function as shown in the figure below:
You can visualize the results by using the Grid option.
Pivot
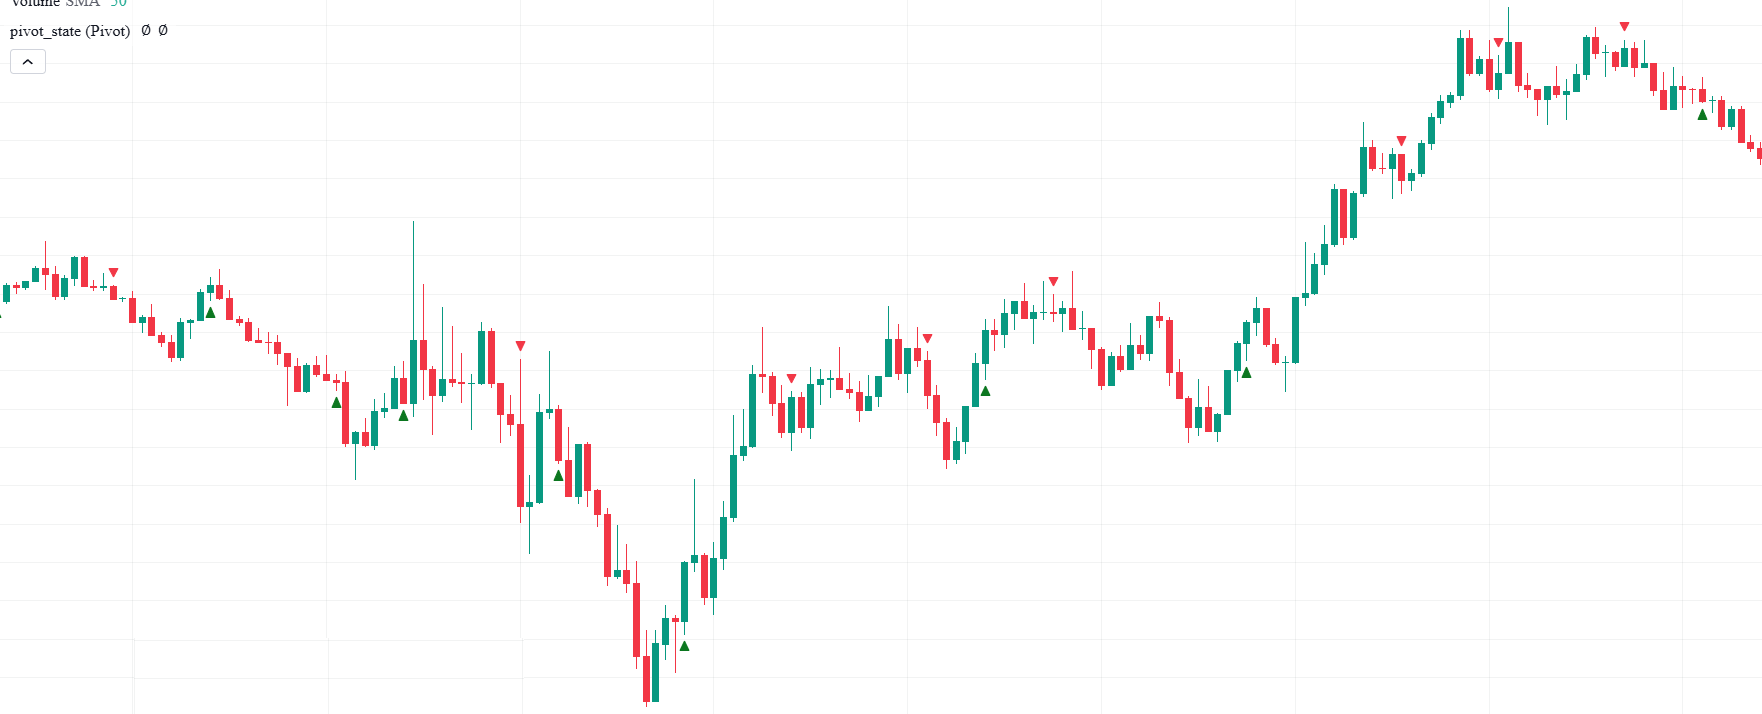
The Pivot function identifies local minimums and maximums in price movements. Since future prices are unknown, the function, like human traders, may occasionally make errors. However, its reliability can be improved by allowing more lag in the detection process.
The inputs of the function are listed below.
Input | Description |
|---|---|
Timeframe(s) | The timeframe(s) in which the function is applied. |
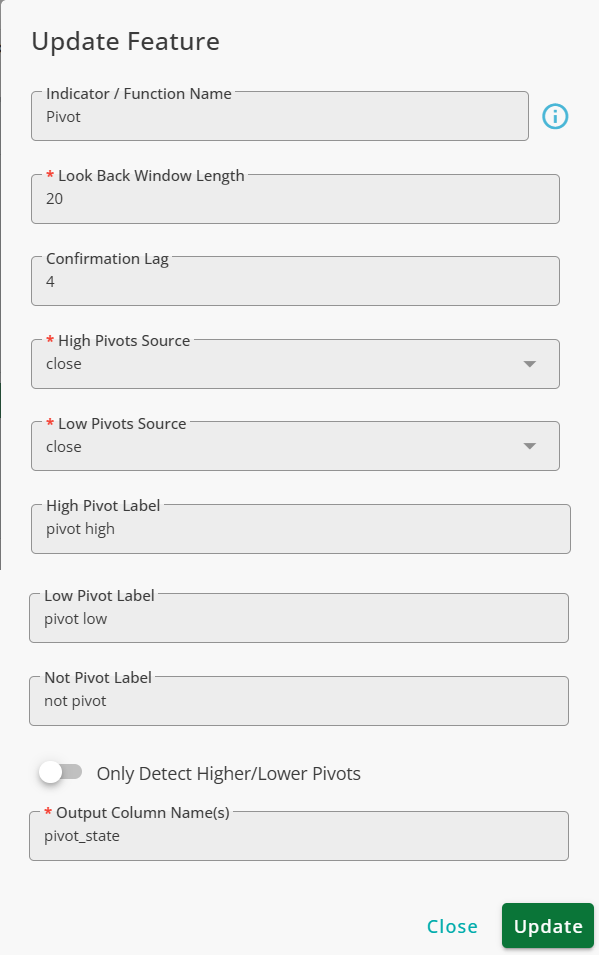
Look Back | The number of candles the function looks at in the past for the current candle to find pivots. |
Confirmation Lag | The number of candles the function waits to confirm a pivot. |
High Pivots Source | The price evaluated to find high pivots. |
Low Pivots Source | The price evaluated to find low pivots. |
High Pivots Label | The label given to high pivots. |
Low Pivots Label | The label given to low pivots. |
Not Pivot Label | The label given to candles that are neither high nor low pivots. |
Only Detect Higher/Lower Pivots | When turned ON, if the function detects a low pivot, it will not detect another low pivot immediately afterward unless the new low is lower than the previous one. For high pivots, the function will not detect a high pivot following another high pivot unless the new one is higher than the previous one. |
Output Column Name(s) | The name given to the result column. |
Example
To find pivots in the price, we use the Pivot function as shown in the figure below.
The result is shown in the figure below.
Memory
The Memory function extends the state of a candle into the future, allowing past events to be referenced in later analyses. By using this function, you can track and utilize previous market conditions for better decision-making.
The inputs of the function are explained in the table below.
Input | Description |
|---|---|
Timeframes | The timeframes in which the function is applied. |
Feature Names | The feature to which the function is applied. |
Memory Window Length | The size of the memory; the labels will be available in the future for the specified number of candles. |
Ignored Values | Values entered in this field are ignored by the function and will not be propagated to the future. |
Output Column Name(s) | The name of the column in which the result will be stored. |
Example
Many events occur within a single candle, but their significance extends beyond that moment. For instance, when two moving averages intersect, it could indicate a potential trend reversal. This event should remain relevant in the analysis even after it initially happens.
To detect intersections, we use the Cross function. For more details, refer to Cross documentation. To retain and utilize these intersections in future analysis, we apply the Memory function as shown below.
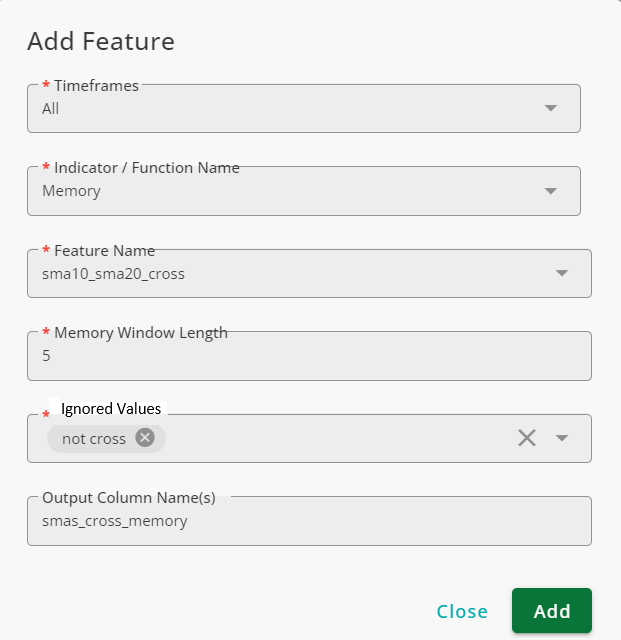
The function is set to ignore not cross values. This means that propagation occurs only when the value of sma_10_sma20_cross is either cross over or cross under.
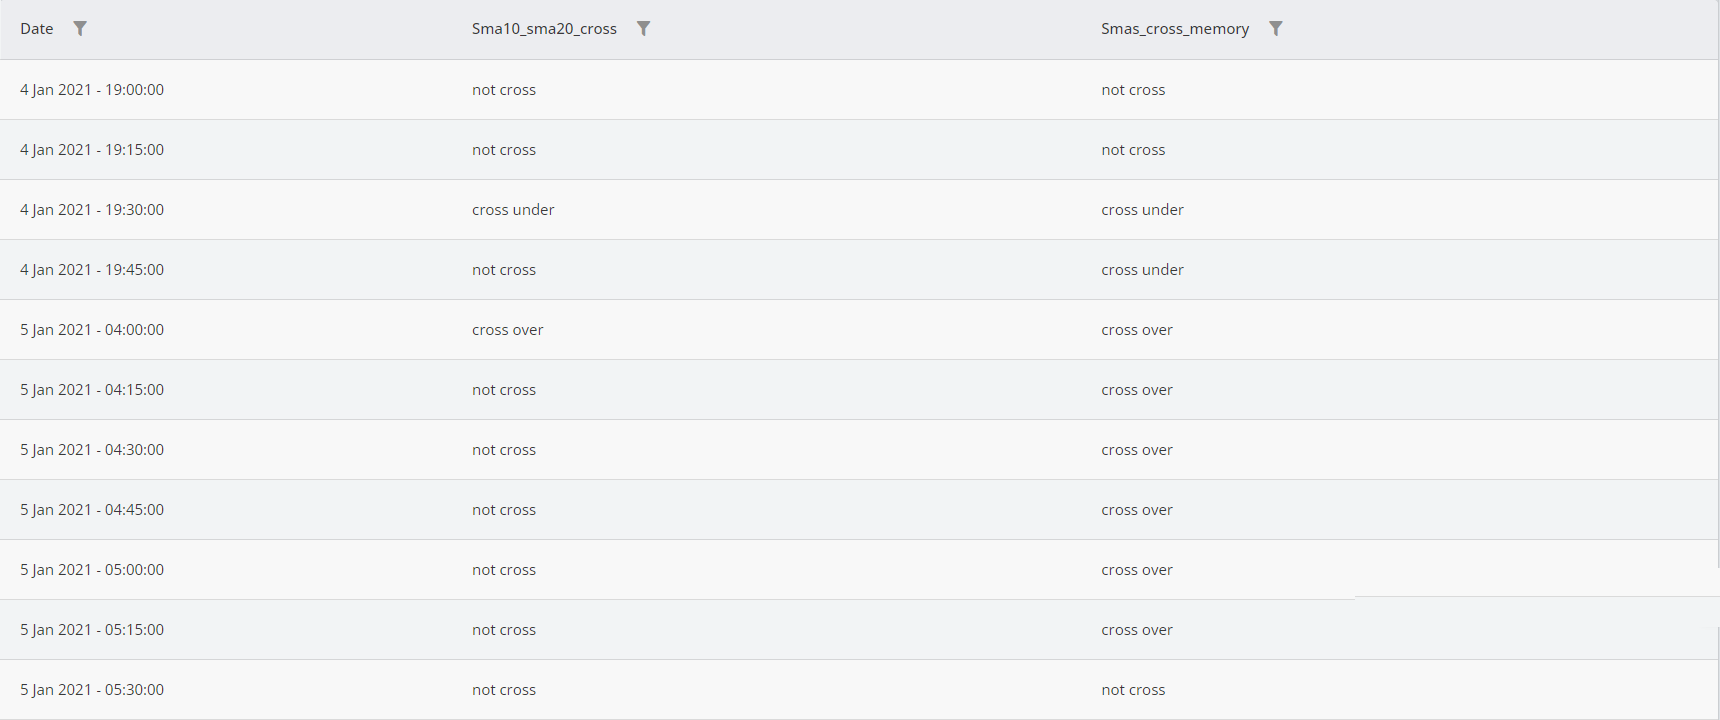
As seen, the function propagates the most recent state of sma_10_sma20_cross for five candles unless its value is not cross. After five candles, the value of smas_cross_memory resets to match sma_10_sma20_cross.
Logical
The Logical function compares the values of one or multiple columns with a threshold and returns true or false.
The inputs of this function are listed in the table below.
Parameter | Description |
|---|---|
Timeframe(s) | The timeframe(s) in which the function is applied. |
Features | The values of the feature(s) that are compared to the Compare Value. |
Higher/Lower | Determines the condition for a true label in the output. If Higher is selected, the output will be true if the values of the selected features in Features are higher than the Compare Value. |
And/Or | If multiple features are selected in Features, the output values depend on the logical operand selected here. If And is selected, the condition must be met for all features simultaneously. If Or is selected, then at least one feature meeting the condition results in a true label in the output. |
Example
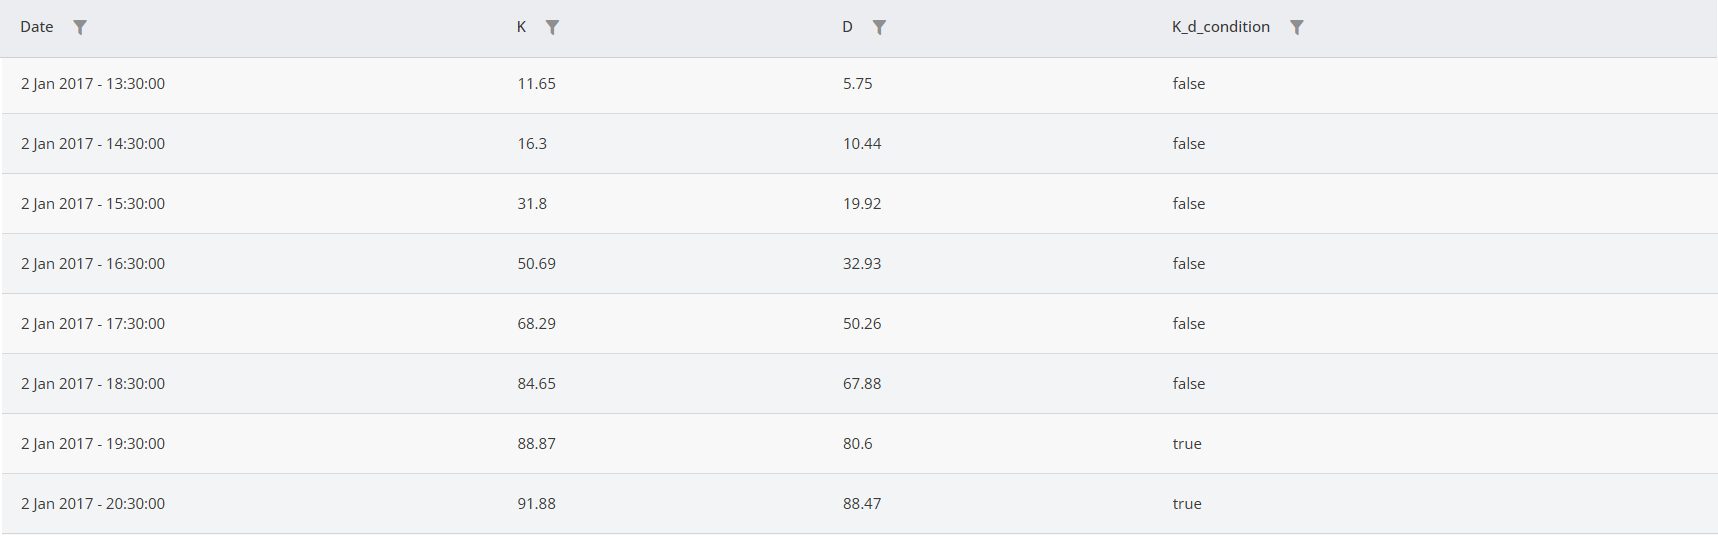
To check if both k and d values of the stochastic indicator are simultaneously higher than 80, the Logical function can be used in the following way:
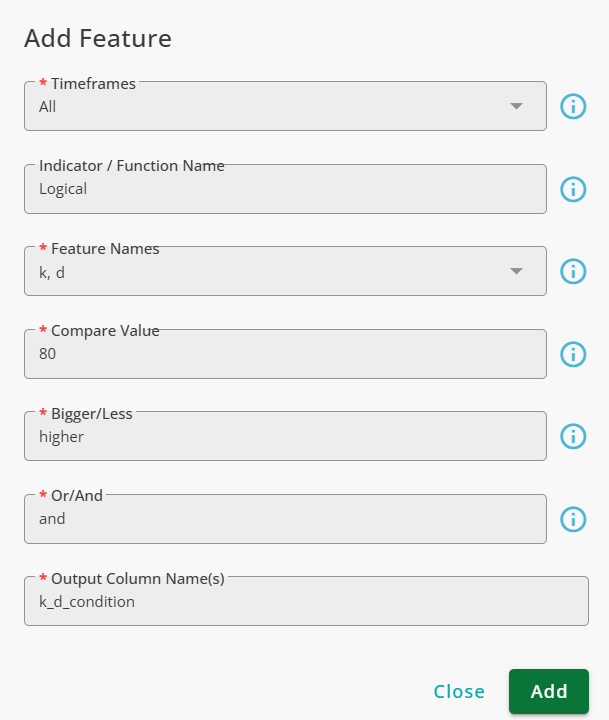
As is shown, the function returns true when both k and d values are higher than 80.
Majority
The Majority function checks whether there is a majority in the labels of a column in a user-specified window or not. The majority in our context is that at least a certain percentage of candles in a window have the same labels.
Finding majorities is beneficial in many cases, especially when markets are volatile because volatility can cause rapid and consecutive changes in the labels. In such situations, relying on the majority helps you make decisions based on the dominant state of the market.
The inputs of this function are explained below.
Input | Description |
|---|---|
Timeframes | The timeframes in which the function is applied. |
Feature Name | The name of the column to which the function is applied. |
Window Length | The size of the window in which the function looks for majorities. |
Threshold | The minimum percentage of candles in the window that a label must possess to become the majority. |
Non-Majority | The label given to candles when there is no majority. |
Out Column Name(s) | The name given to the result column. |
Note that when a majority is present, the label that is the majority in the window is written in the result column.
Example
RSI is one of the most well-known technical indicators, commonly used to identify buying and selling opportunities in its oversold and overbought regions, respectively.
Using the Advanced Labeling function, create a column named rsi_strategy that categorizes RSI values into normal, overbought, and oversold labels. Then, apply the Majority function as shown below:
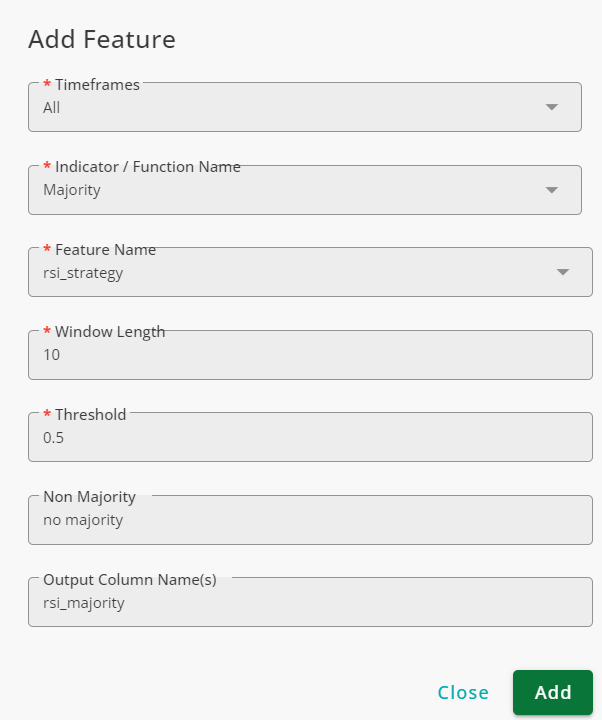
By applying the above configurations, the Majority function identifies majorities within a rolling window of 10 candles. Since the threshold is set to 0.5, at least 50% of the labels in a given window must be the same for that label to be considered the majority.
This window operates in a backward-looking manner, meaning that for each candle, the function evaluates the most recent 10 candles. However, the current candle itself is excluded from the window, as its state is uncertain in real-time trading.
The figure below illustrates the results.
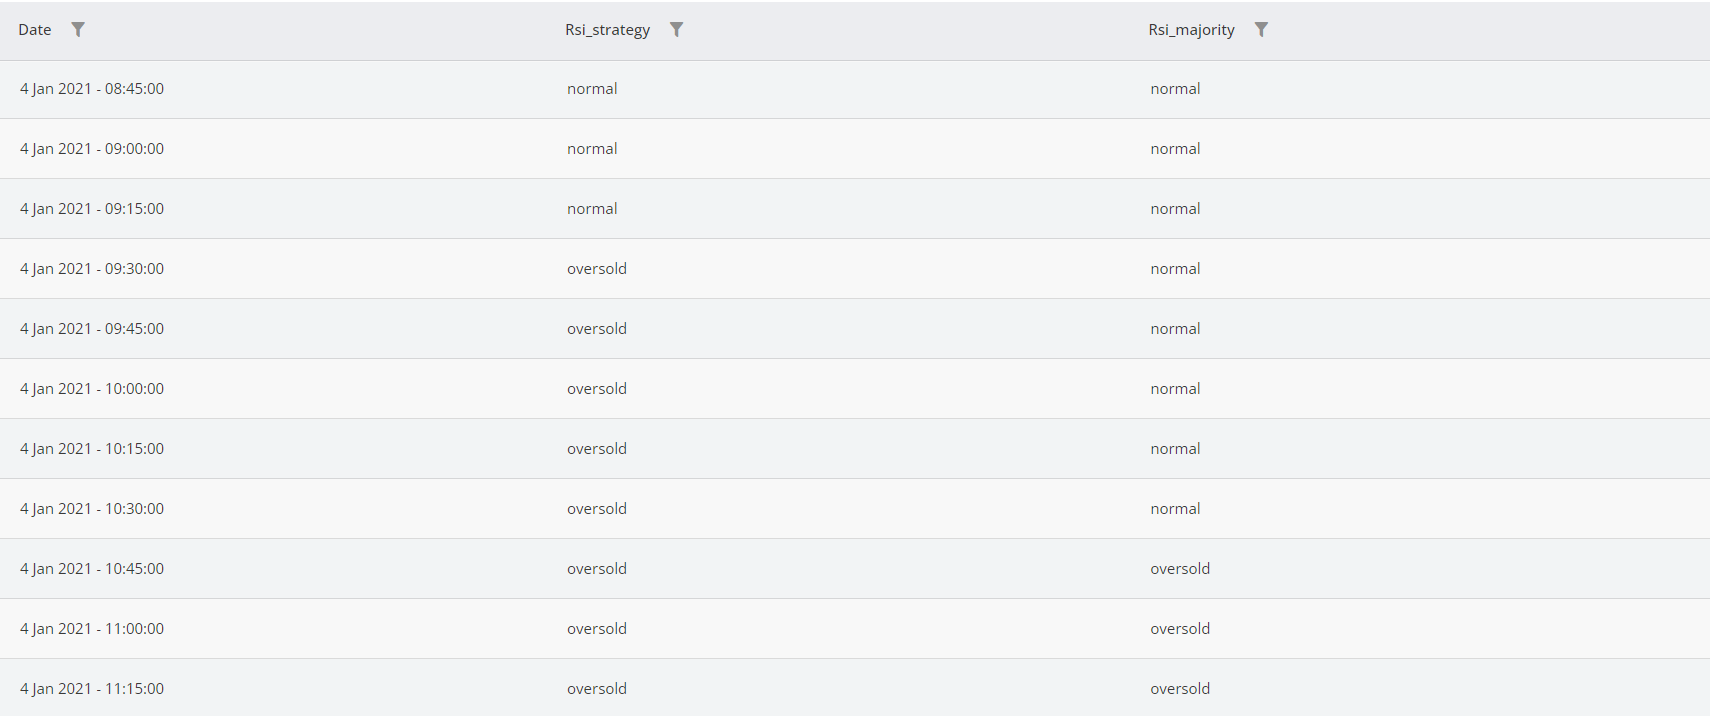
As observed, at 9:30:00 on January 4th, 2021, the RSI's state shifts from normal to oversold. However, the rsi_majority does not immediately reflect this change. It only updates once at least five candles (50% of the ten-candle window) have oversold labels within the most recent ten candles.
Optimum
The Optimum function examines candles within a backward-looking window and determines whether a selected feature is a local minimum or maximum within that window. For each candle, the function outputs one of the following labels based on the feature's value in a window of size n:
not optimum: The feature is neither a local minimum nor a maximum.
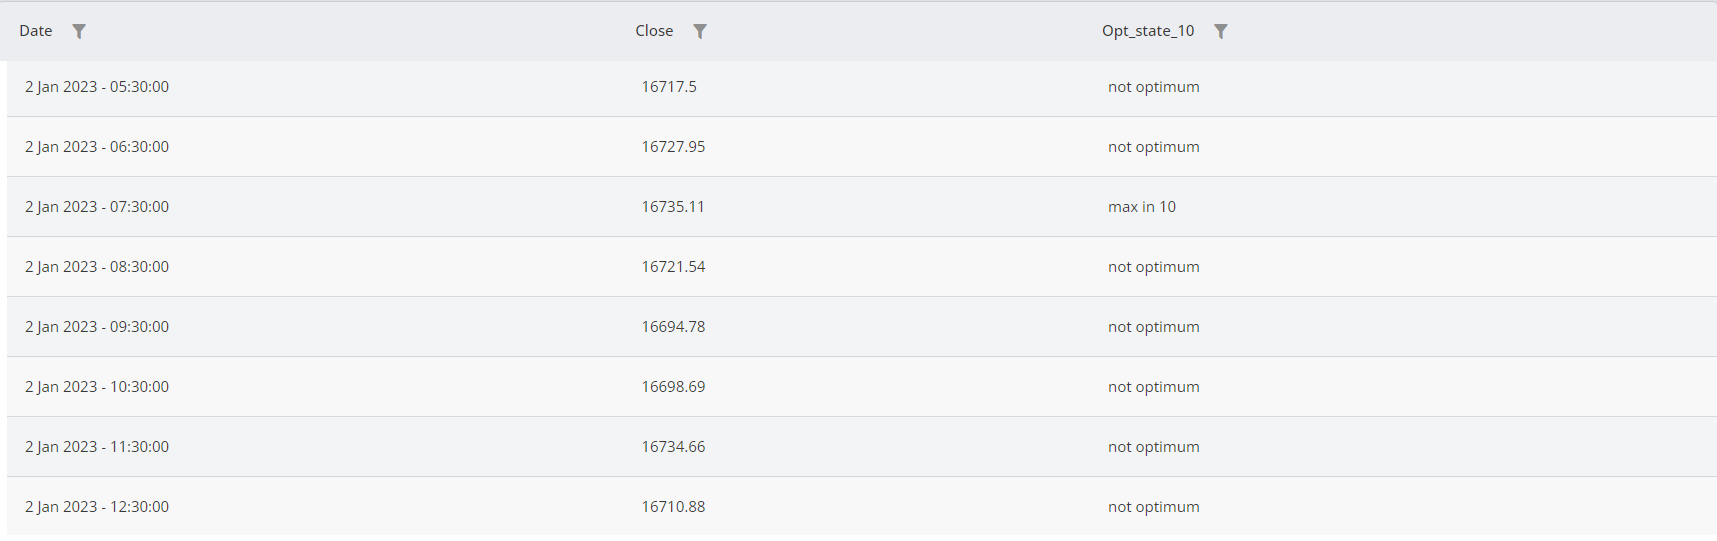
max in n: The feature is the highest value within the last n candles.
min in n: The feature is the lowest value within the last n candles.
The inputs of the function are explained in the following table.
Input | Description |
|---|---|
Timeframes | The timeframe(s) in which the function is applied. |
Feature | The feature that the function tracks; only numeric features are accepted. |
Look Back | The size of the backward-looking window. |
Example
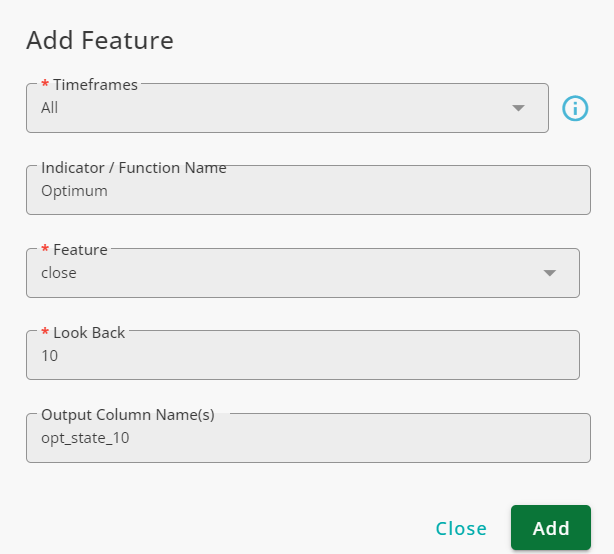
To determine whether the current candle's price is the highest or lowest in the last 10 candles, you can use the Optimum function as shown in the figure below.
For each candle, the function compares the close price with the previous nine candles and determines whether the close price is the highest or lowest within the window.
Sort
Sort checks the order of values across multiple input features and labels each candle as ascending, descending, equal, or not sorted. The exact order of features can be used for further analysis.
The inputs of this function is explained in the table below.
Input | Description |
|---|---|
Timeframes | The timeframe(s) in which the function is used. |
Lines in Order of Check | The list of columns to be used, in the exact order of interest. All columns must be numeric. |
Output Column Name(s) | The name of the column in which the result is stored. |
The system uses the order in which the features are entered. For example, when a candle is labeled as ascending, it means that the first feature has the lowest value, the second feature has the second-lowest value, and so on.
Example
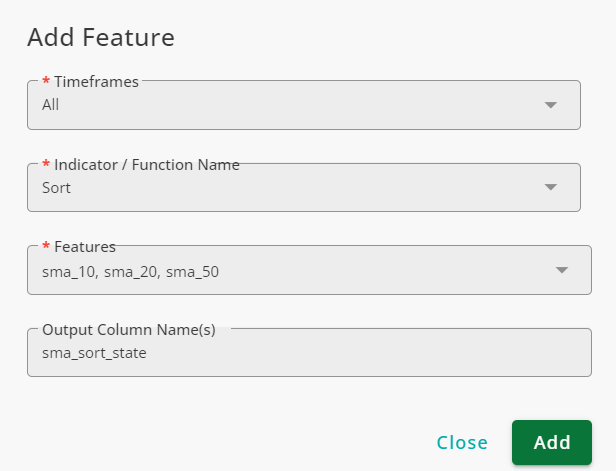
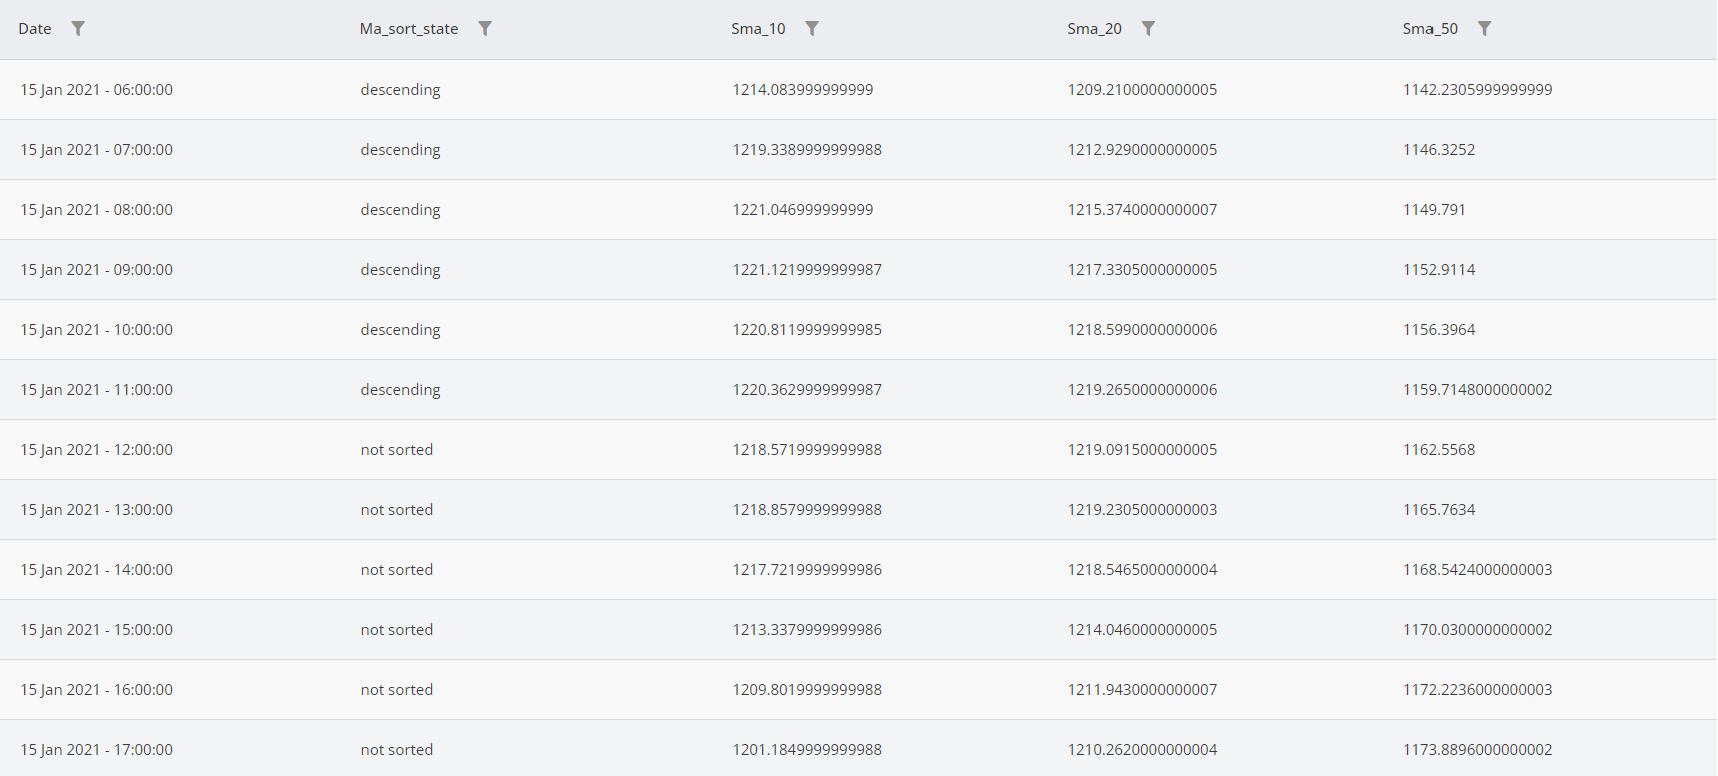
One of the popular methods for trend detection is using three or more moving averages with different window sizes. In this example, we want to use three moving averages with window sizes of 10, 20, and 50 to detect trends. In this method, when MA10 > MA20 > MA50, we are in a bullish trend, and when MA10 < MA20 < MA50, the market is bearish. The Sort function is used as shown in the figure below.
As seen in the figure below, when ma_sort_state is labeled as descending, the order is MA50 > MA20 > MA10.
Label Shift
This function shifts the labels of a column and stores the result in a new column. This help you access previous labels in a column with a user-specified lag.
The inputs of Label Shift is listed below.
Input | Description |
|---|---|
Timeframes | The timeframe(s) in which the function is used. |
Feature | The feature you want to shift. Note that only columns with labels are acceptable. Use Shift for features with numeric values. |
Value | The number of rows by which the column is shifted. Positive values shift the labels forward, while negative values bring labels from the future, which is not possible in real-time trading. |
Fill Value | When a column is shifted by X rows, depending on the value of X, the first or last X rows of the feature will be empty and are filled by Fill Value. |
Example
Assuming that we have a column that shows the state of RSI (normal, overbought, and oversold), Using the Label Shift with the configurations shown below, we shift this column to future by 5 time steps (rows).
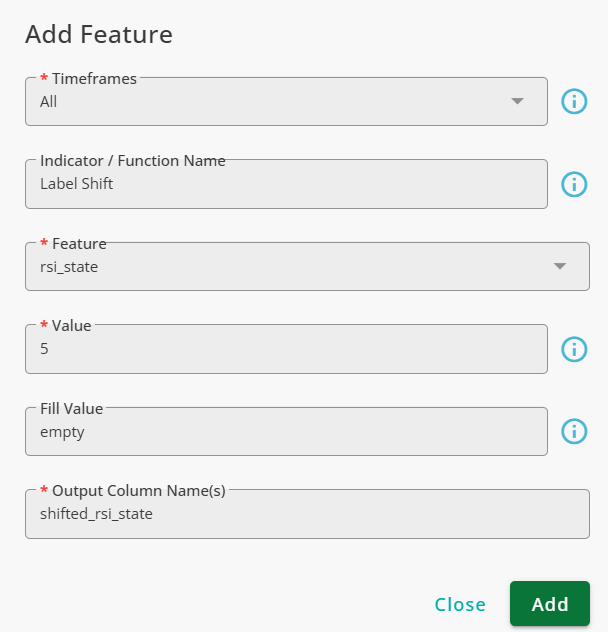
The output of this function and rsi_state are shown below.
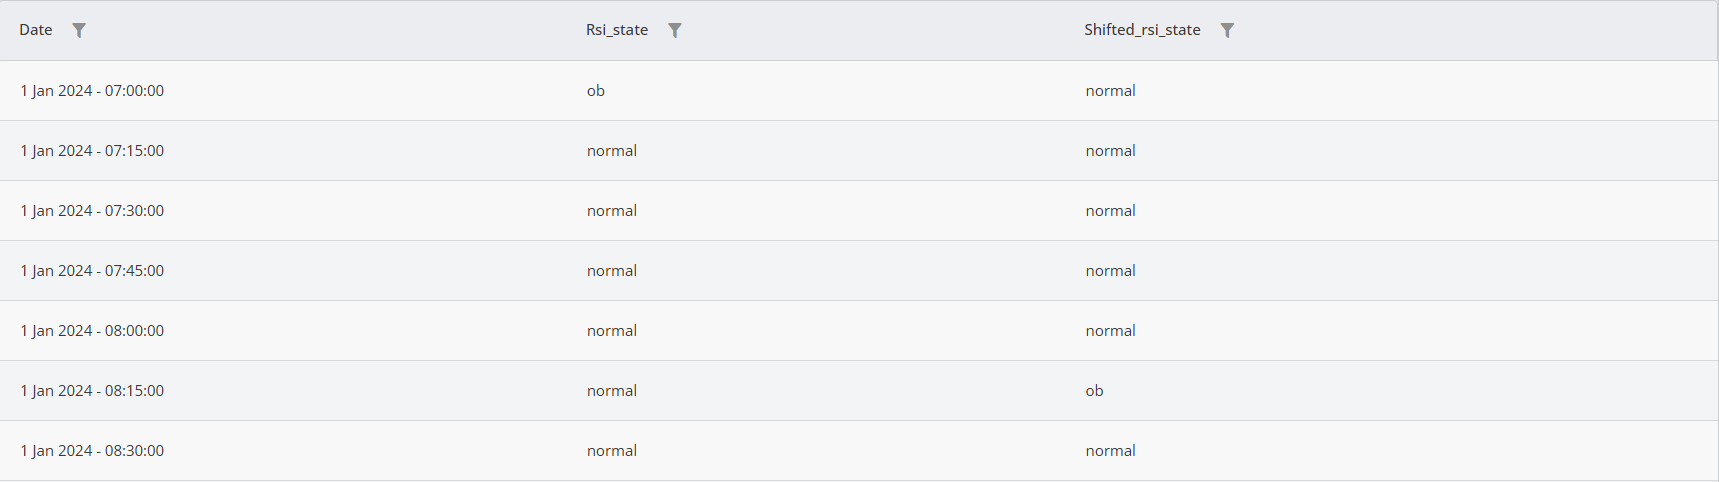
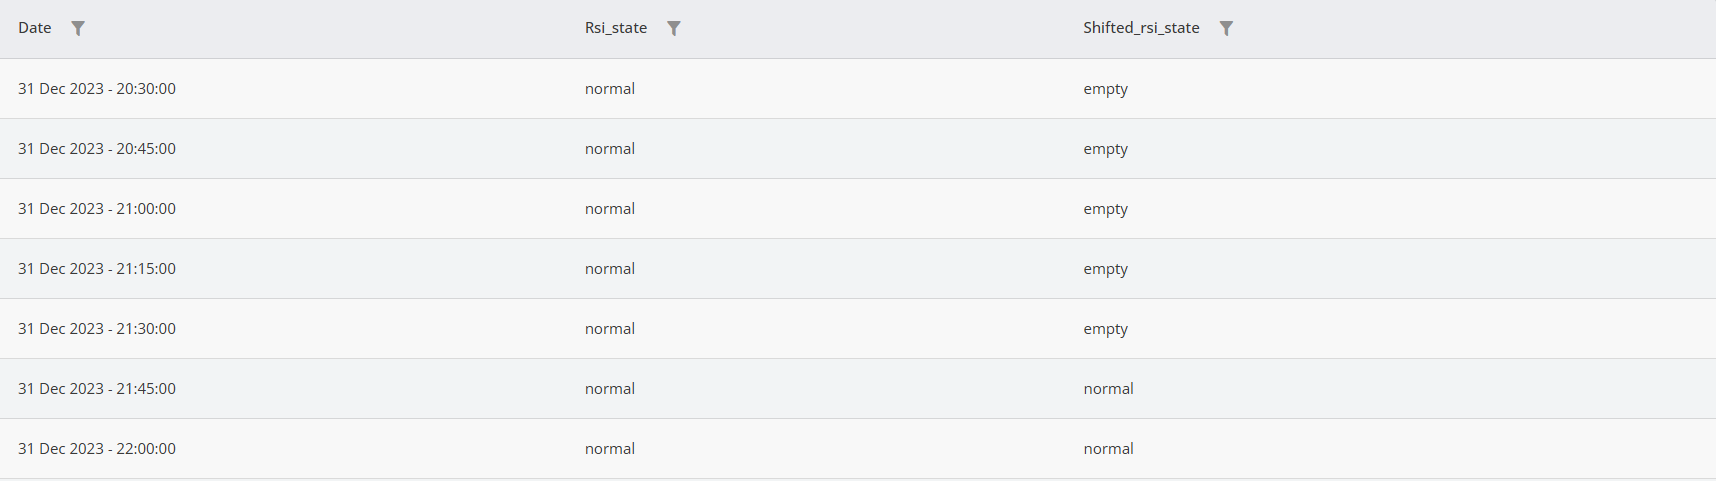
As seen, the values of rsi_state are repeated in shifted_rsi_state with a 5-time-step lag.
Notice that the first 5 rows of shifted_rsi_state at the beginning of the column are filled with the empty label.
State Transition
State Transition is used to detect state transitions in columns containing labels. The function checks the current and previous column labels and reports whether the candle's label has changed.
The inputs of the function are explained in the table below.
Input | Description |
|---|---|
Timeframes | The timeframe(s) in which the function is applied. |
Feature Name | The column the function observes to find state transitions; it must be a column with labels. |
Output Column Name(s) | The name given to the column that stores the result. |
Example
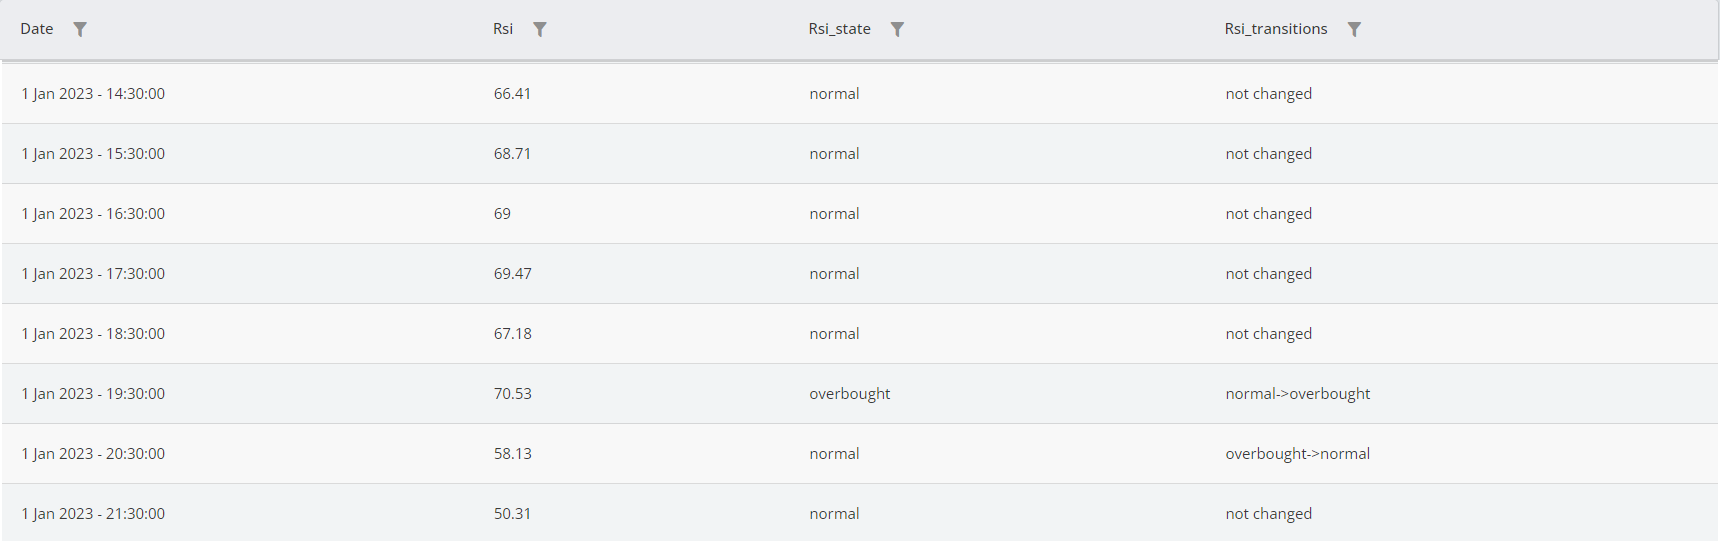
Assuming you have a column named rsi_state that reports the RSI state (normal, overbought, and oversold) for each candle, you can use the State Transition function as shown below to detect state transitions in the column.
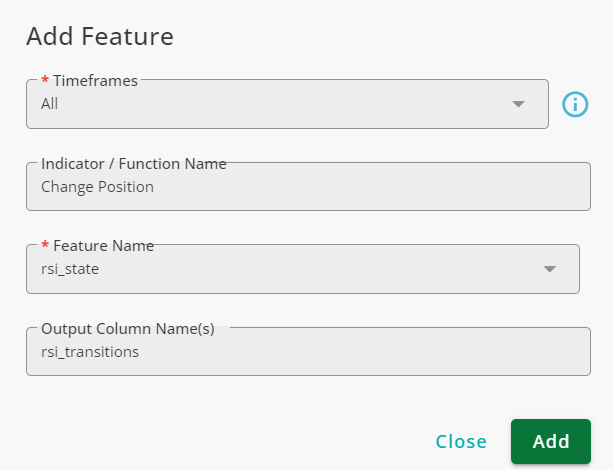
As seen, the function tracks the labels in the rsi_state column and reports state transitions.
Aggregation
The Aggregation function is used to aggregate the values of multiple numeric columns. The output of this function is a column with its values coming from the selected columns.
The inputs of this function are explained in the table below.
Input | Description |
|---|---|
Timeframes | The timeframes in which the function is applied. |
Lines | The columns to be aggregated. (Only numeric columns are accepted.) |
Aggregation Method | The method used to aggregate the columns; this could be Max, Min, or Mean. |
Output Column Name(s) | The name of the column in which the result is stored. |
Example
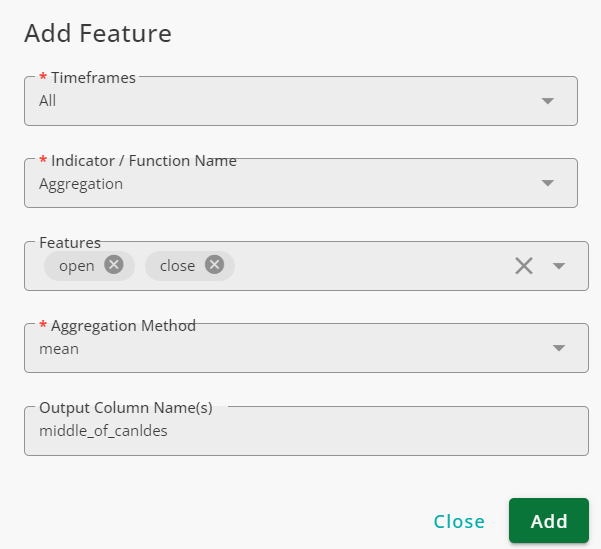
Sometimes, traders use the middle point in the bodies of candles to judge the markets. To obtain the middle price in candles, we add the open and close prices and use the Aggregation function to find the middle price between the open and close prices, which is the middle of the candles. The configuration of the Aggregation is shown below:
The result of the aggregation is illustrated in the figure below.
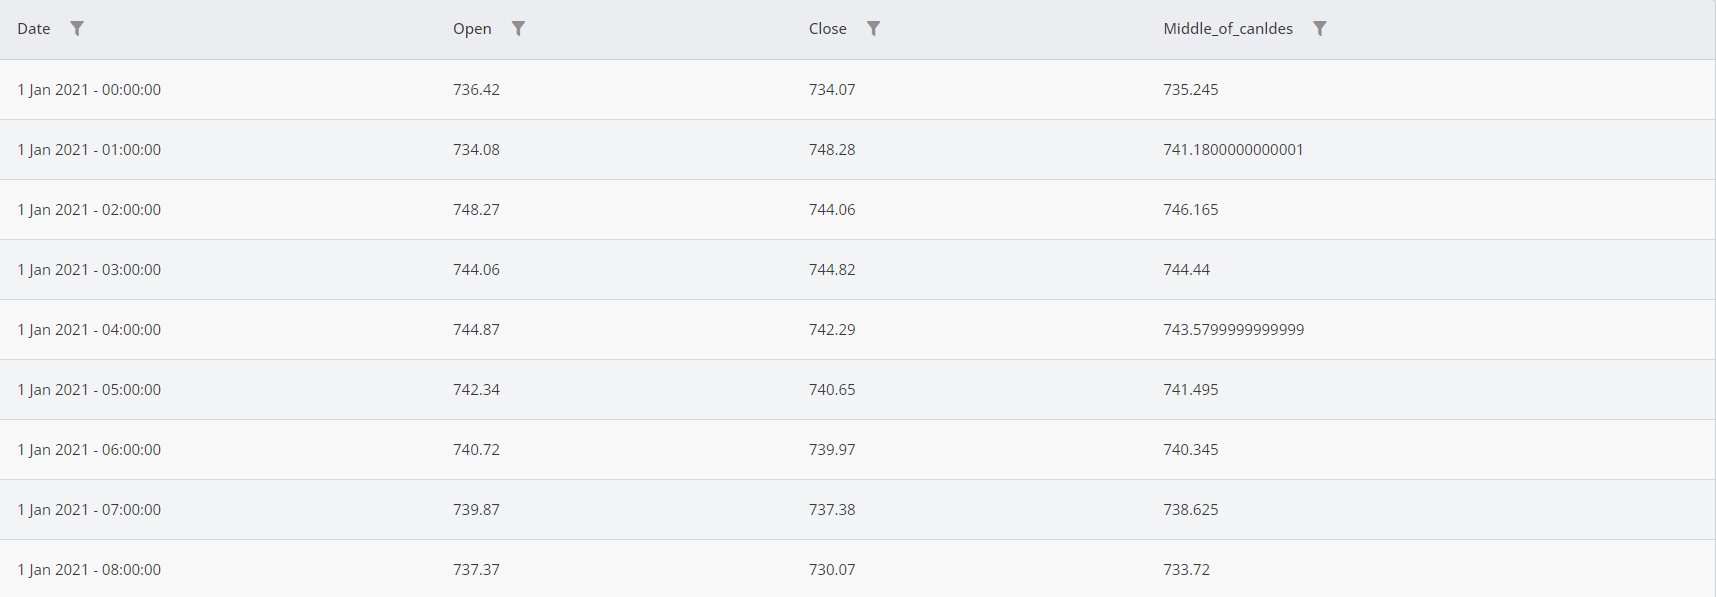
As shown in the table, the middle_of_candles column contains the mean value of the open and close columns. Similarly, you can use Maximum and Minimum to obtain the maximum or minimum values from two or more columns in the same way.
Divergence
Indicators usually follow the price, but when an oscillator fails to do so, divergence occurs. Bullish divergence happens when the price makes new higher highs or lows while the indicator does not, whereas bearish divergence occurs when the price makes new lower highs or lows while the indicator fails to follow.
The Divergence function identifies both regular and hidden divergences between the close price and any selected indicator.
The inputs for this function are explained below.
Input | Description |
|---|---|
Timeframes | The timeframe(s) in which the function is applied. |
Indicator Name | The name of the indicator compared to the price for divergence identification. |
Left Pivot Window Length | The function compares the pivots in the price and the indicator. Any candle that is a local maximum or minimum in the data is considered a pivot. To detect pivots, the function compares a data point with its neighbors. This parameter defines how many candles from the left side of the candle are compared to the candle. |
Right Pivot Window Length | The function compares the pivots of the price and the indicator by comparing a data point with its neighbors. This parameter defines how many candles from the right side of the candle are compared to the candle. Note that the larger this parameter becomes, the more lag is added to the function. If you use too small values, the function might detect false pivots. |
Confirmation Lag | After the function detects a divergence, the divergence is unconfirmed, meaning the price/indicator's future behavior might revoke the divergence. Using confirmation lag gives more time for the function to confirm the divergence. Note that the larger this lag becomes, the more time the system takes to confirm a divergence, so you might lose trading opportunities. |
Pivot Source | The data used for pivot detection. When High/Low is used, the high price of the candle is used for high pivot detection, and the low price of the candle is used for low pivot detection. If Close is used, the close price of the candles is used. |
Divergence Type | There are two types of divergence: Regular and Hidden. Regular divergence signals a potential trend reversal, and hidden divergence signals a possible trend continuation. Hidden divergences are considered stronger signals (and are less commonly seen compared to regular divergences). |
Output Column Name(s) | The name given to the column in which the result is stored. |
Example
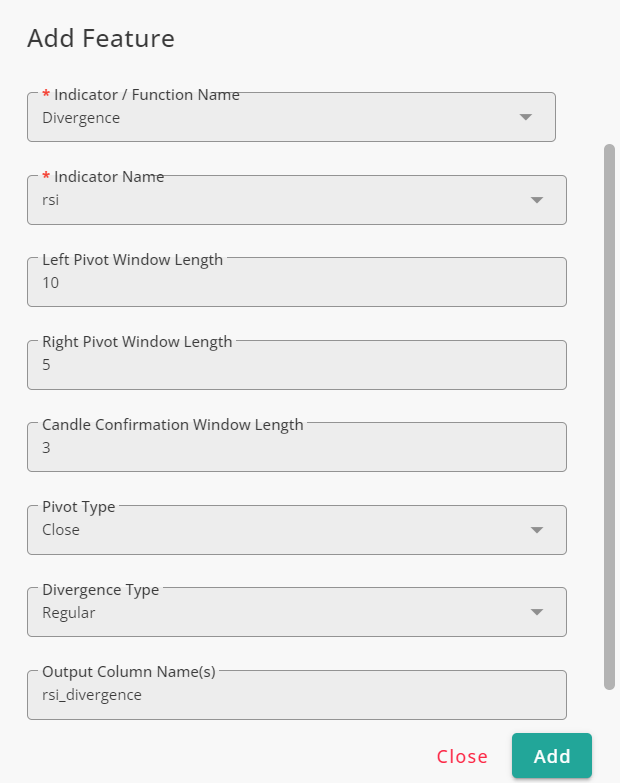
To identify regular divergences between the close price and the RSI, the Divergence function is used as shown below.
The results can be visualized using the Chart tool.
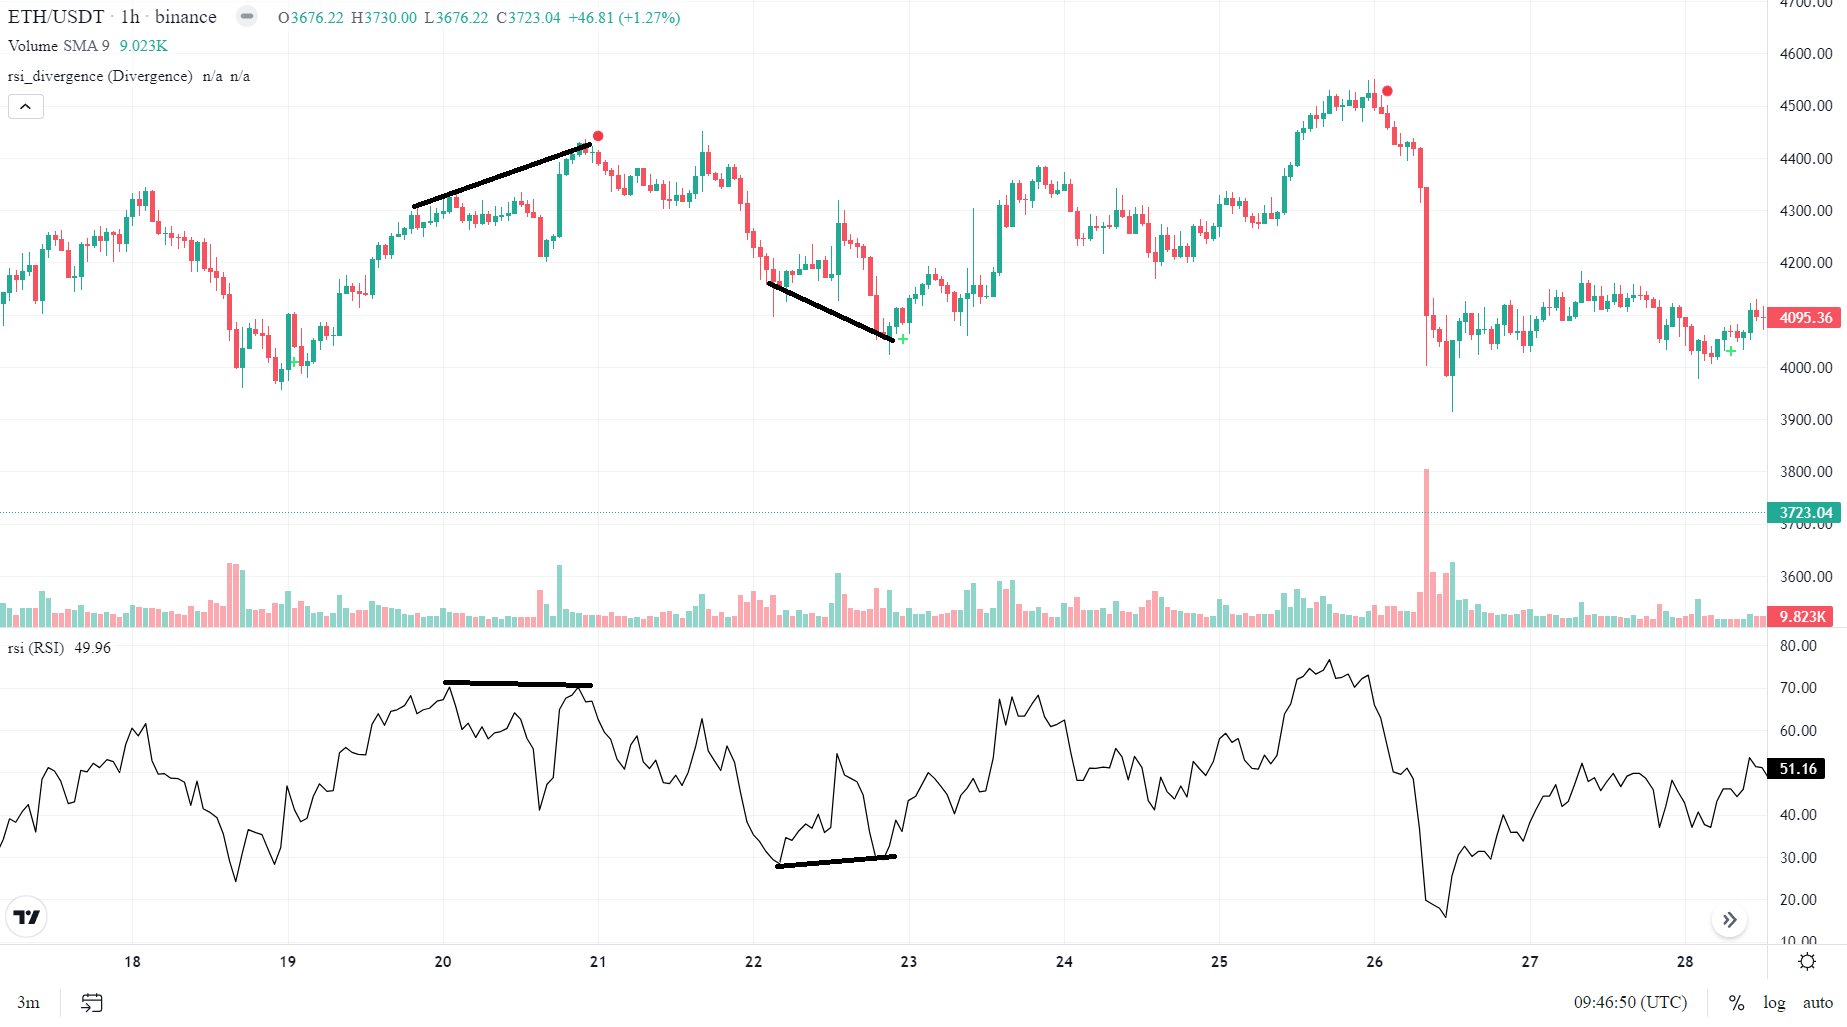
The green plus signs indicate positive regular divergence, while the red circles represent negative regular divergence.
Features Divergence
As explained in the Divergence section, you can find regular and hidden divergences between the close price and technical indicators using the Divergence function. The Features Divergence function provides the same capability but allows you to find divergences between any two numeric features of your choice. The inputs of this function are similar to those of the Divergence function. However, instead of being limited to the close price as the first feature, you can select both features involved in the calculations.
The inputs of this function is explained in the table below.
Input | Description |
|---|---|
Timeframes | The timeframe(s) in which the function is applied. |
First Feature | The name of the feature used as the base of calculations and used to compare with the second feature for divergence identification. |
Second Feature | The name of the second feature compared to the first feature for divergence identification. |
Left Pivot Window Length | The function compares the pivots in the first feature and the second one. Any candle that is a local maximum or minimum in the data is considered a pivot. To detect pivots, the function compares a data point with its neighbors. This parameter defines how many candles from the left side of the candle are compared to the candle. |
Right Pivot Window Length | The function compares the pivots of the first feature and the second one by comparing a data point with its neighbors. This parameter defines how many candles from the right side of the candle are compared to the candle. Note that the larger this parameter becomes, the more lag is added to the function. If you use too small values, the function might detect false pivots. |
Confirmation Lag | After the function detects a divergence, the divergence is unconfirmed, meaning the first feature/second feature behavior might revoke the divergence. Using confirmation lag gives more time for the function to confirm the divergence. Note that the larger this lag becomes, the more time the system takes to confirm a divergence, so you might lose trading opportunities. |
Divergence Type | There are two types of divergence: Regular and Hidden. Regular divergence signals a potential trend reversal, and hidden divergence signals a possible trend continuation. Hidden divergences are considered stronger signals (and are less commonly seen compared to regular divergences). |
Output Column Name(s) | The name given to the column in which the result is stored. |
Example
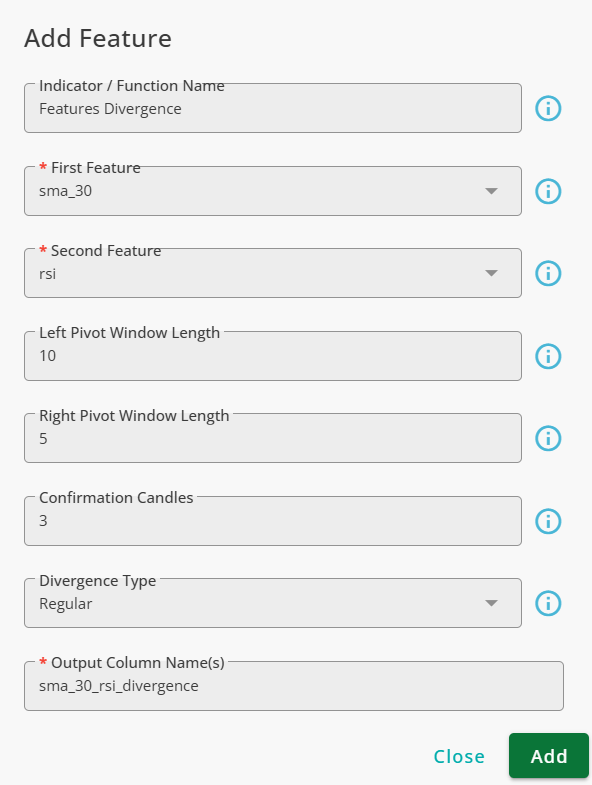
To identify regular divergences between the SMA 30 and the RSI, the Features Divergence function is used as shown below.
The results can be visualized using the Chart tool.
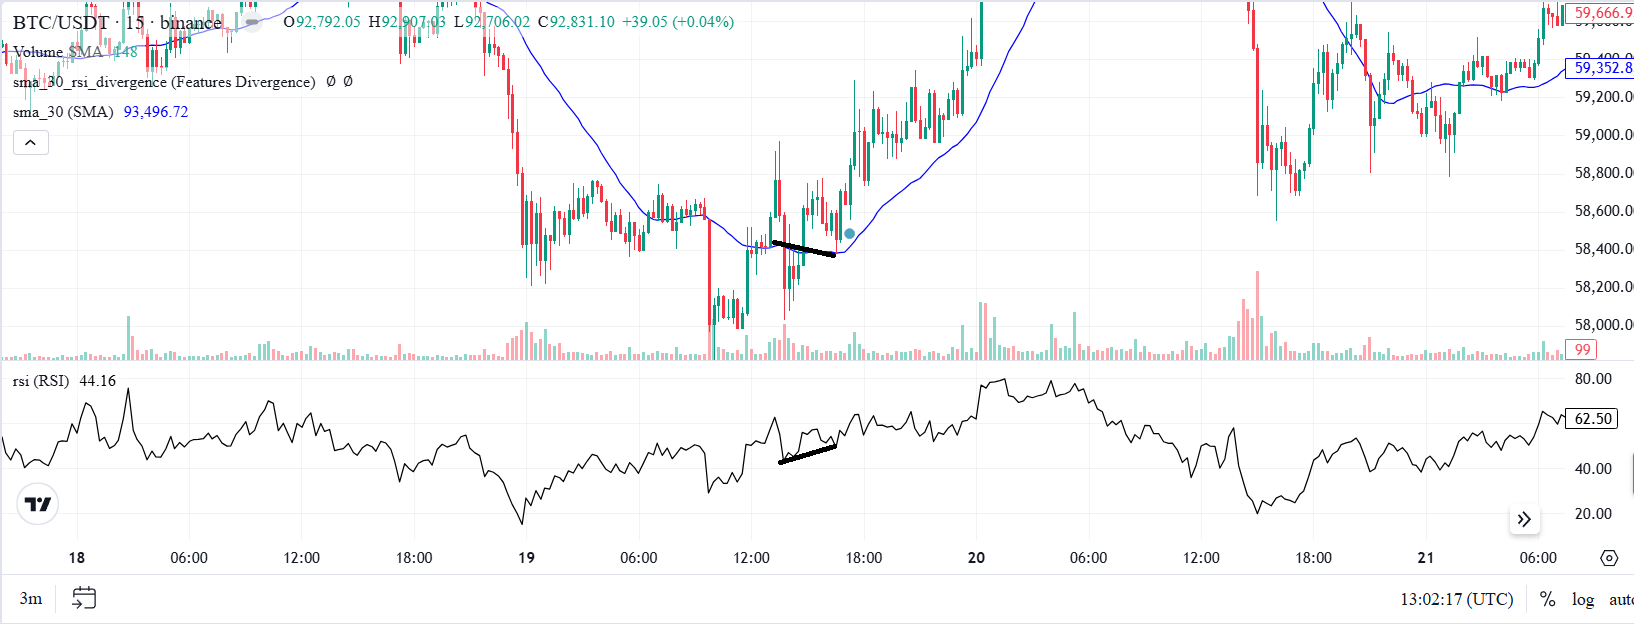
As seen, the function detects divergences between the SMA 30 and the RSI indicator.
Advanced Labeling
The Advanced Labeling function allows you to compare the values of technical indicators and OHLCV data with each other or user-defined thresholds. Using this function, candles are labeled based on the relationships between the price and technical indicators. Users can either use a keyboard to enter conditions or write them manually. The inputs of the function are explained in the table below.
Input | Description |
|---|---|
Timeframes | The timeframes in which the function is applied. |
References | The indicators or OHLCV data evaluated to label the candles. |
Conditions | The labels and corresponding conditions are defined here. |
Not Matched Value | The value assigned to candles when none of the conditions are met. |
Output Column Name(s) | The name given to the column that stores the result. |
To define conditions, a calculator-like GUI is provided. This keyboard allows you to set conditions efficiently. Its buttons include the following:
Input | Description |
|---|---|
Numbers | Use digits to define your thresholds. |
AND / OR | Use AND and OR operands to combine two or more conditions. |
Shift | Use this button to shift values on the time axis. You can only shift values to the future, meaning that you can use only past data to define conditions, not future data. |
Mathematical Operands | The following mathematical operators are provided: +, -, *, /, and power (^). |
Comparison Operands | The following comparison operators are used to compare feature values with fixed thresholds or other features: greater (>), less (<), equals to (==), and not equals to (!=). |
References | The references you select are also available on the keyboard. |
To speed things up, one can alternatively type the conditions without using the keyboard. To do so, you can write the expression yourself. To refer to the references, use syntax where n is the number of the reference starting from zero for the first selected reference.
Examples
RSI Regions
The RSI is a technical indicator that ranges between zero and 100 and has three regions. When the RSI is less than 30, It is oversold. When it is between 30 and 70, the RSI is in the normal region, and in the overbought region, the RSI readings are greater than 70. To label candles with respect to the readings of the RSI, we use the Advanced Labeling function as shown below.
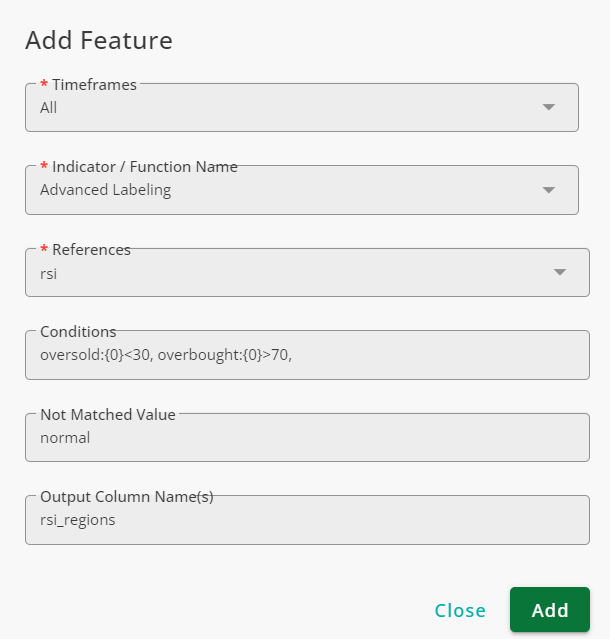
To define conditions, click on Conditions box and then click on Add Expression. In the Add Expression window, you should define a label and its corresponding condition. You can use the keyboard provided to define conditions. For example, the oversold region is defined in the following manner:
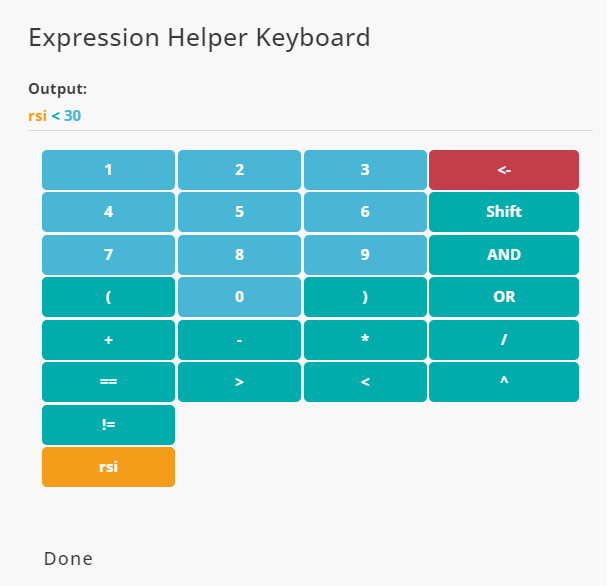
Instead of using the calculator, the two regions can be defined by the manually-written expressions. For oversold region:
For overbought region:
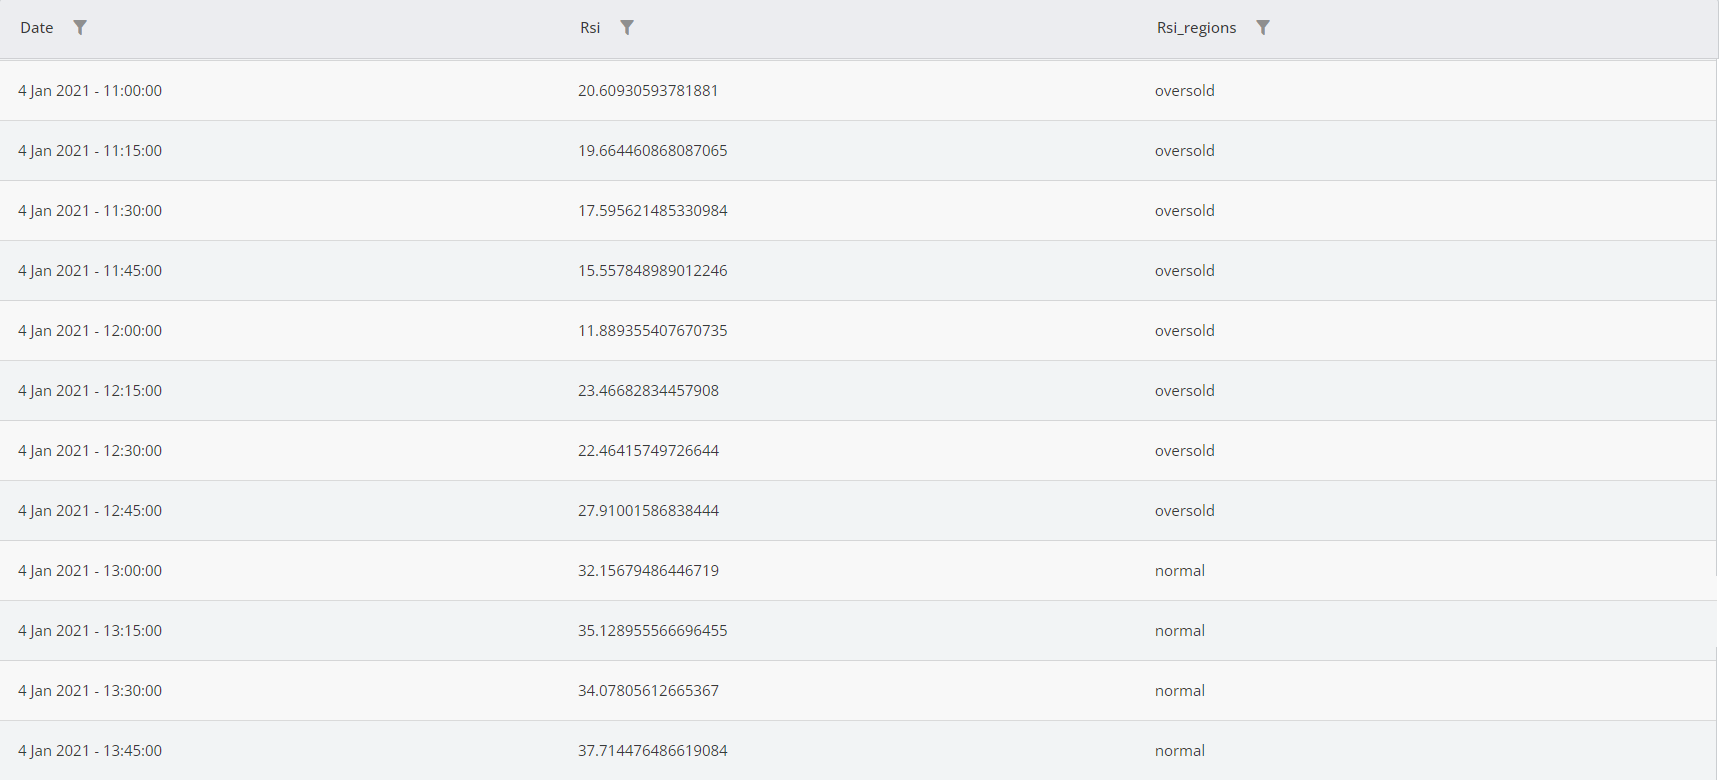
The result is shown in the figure below.
Simple Strategy
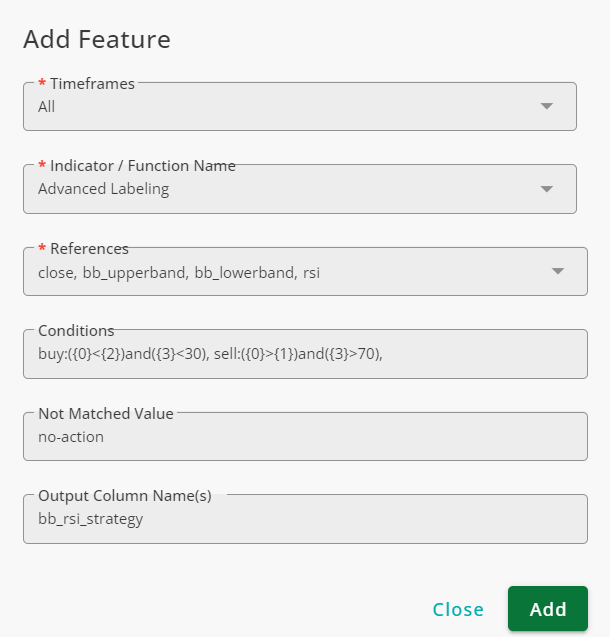
A trading strategy is a set of rules that indicate buying and selling points. Using Bollinger Bands and RSI, the following strategy is introduced:
Buy: When the price is under the lower band of the Bollinger and the RSI is oversold
Sell: When the price is above the upper band of the Bollinger and the RSI is overbought
To implement the strategy, we use the Advanced Labeling function. Inputs of the function are shown below.
The Keyboard is shown for buy and sell labels below
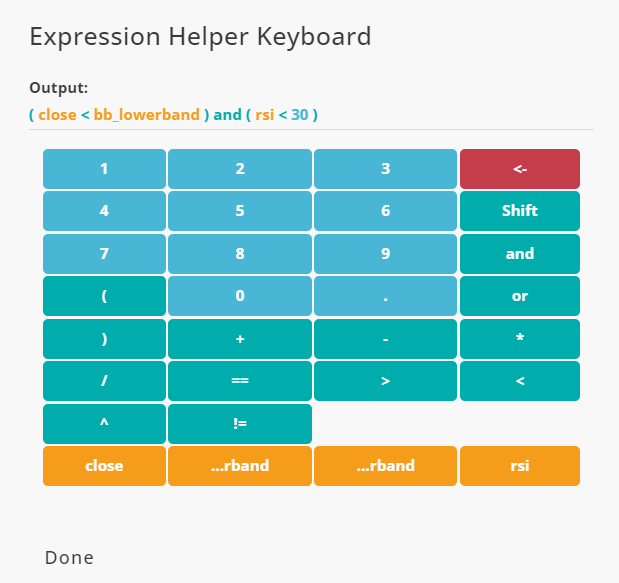
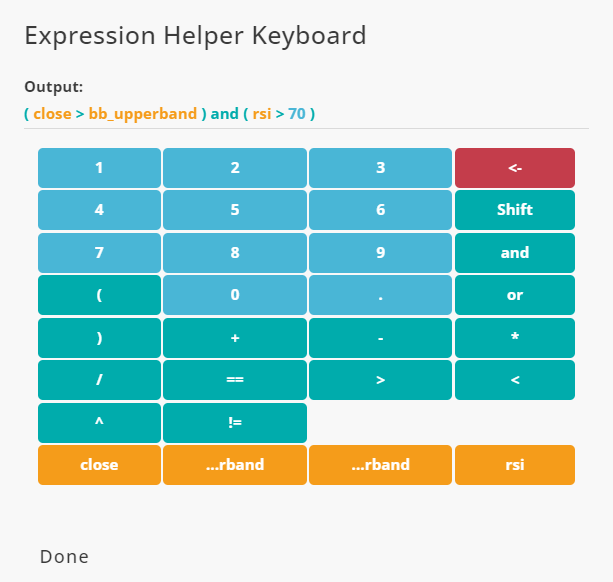
Note that you MUST use parenthesis if logical operands (AND, OR) and shift are used.
Confirmed Break
Confirmed Break checks if the price breaks another price level and waits for the break to be confirmed. If the close price moves above a certain price level and the body of the next candle remains above that level, it is considered a confirmed break up. Similarly, if the price moves below a price level and the body of the next candle remains below that level, it is classified as a confirmed break down.
The inputs of this function are explained below.
Input | Description |
|---|---|
Timeframes | The timeframe(s) in which the function is applied. |
Feature | The level against which the price is checked. |
Output Column Name(s) | The name given to the column that stores the result. |
Example
To check whether the price breaks SMA 30, you can use the Confirmed Break function as shown in the figure below:
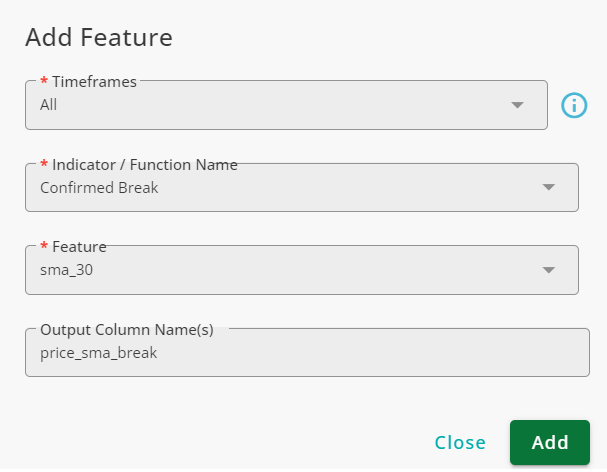
Samples of confirmed break up and confirmed break down are shown with green and red squares, respectively.

Moving Average Group
Moving Averages are widely used in trading strategies. Moving Average Features adds many MA-related features in bulk. The added features can be used for trend detection in different ways. The inputs of this function are explained below.
Input | Description |
|---|---|
Timeframe | The timeframes in which the features are added. |
Source | The column to which moving averages (MAs) are applied. Any numeric feature can be used, but traders usually use OHLCV. |
Moving Average Type | The type of moving average used for features. This could be a simple moving average or various weighted moving averages. |
MA Window Length | The size of the moving average window. |
Startup Candles | The Diameter function is used in the features, and this function has a warmup period. This input defines the warmup period of the Diameter function. For further details, refer to the documentation of the Diameter. |
Fast MA Window Length | The window size of a simple moving average (Fast) used in conjunction with another moving average (Slow) for trend identification. |
Slow MA Window Length | The window size of a simple moving average (Slow) used in conjunction with another moving average (Fast) for trend identification. |
To be Sorted MA Window Sizes | One way of trend detection is checking the order of multiple moving averages. Enter the window sizes of as many MAs as you want, and the system automatically checks their order. The Sort function is used for this purpose. For further details, refer to the documentation of this function. |
The outputs of the function are reported in the following columns.
Output | Description |
|---|---|
Moving Average | The data of the moving average selected in the Moving Average Type field. |
Price to MA Distance | The distance between the price and the moving average. |
Normalized Slope | The normalized slope of the moving average obtained by applying the Normalized Slope function to the moving average. Refer to the Normalized Slope documentation for further details. |
Normalized Slope Sign | The sign of the moving average slope (positive or negative). |
Price MA Cross | The result of applying the Cross function to the price and the moving average selected by the user. Refer to the Cross function documentation for further details. |
Labeled Price to MA Distance | The data in this column describes the distance between the moving average and the price using the labels near, far, and moderate. |
MA Condition | Reports the relative position of the price to the moving average. When the price is above the moving average, this column is bull; when it is below the moving average, it is bear. |
MA Condition Majority (50) | The result of applying the Majority function to MA Condition with a window size of 50. Refer to the Majority function documentation for further details. |
MA Condition Majority (20) | The result of applying the Majority function to MA Condition with a window size of 20. Refer to the Majority function documentation for further details. |
MA Cross | The result of applying the Cross function to the Fast and Slow moving averages. Refer to the Cross function documentation for further details. |
MA Sort | The result of applying the Sort function to the group of moving averages with window sizes defined in the To be Sorted MA Window Sizes field. Refer to the Sort function documentation for further details. |
Symbol
The Symbol function adds a categorical column to a market data. Use this function if you want your machine learning models to be aware of the coin it is trading. The model treats this column as a categorical feature.
Input | Description |
|---|---|
Timeframes | The timeframe(s) in which the function is applied. |
Output Column Name(s) | The name given to the column that stores the result. |
Example
To add a column named Name_of_Pair that contains labels indicating the pair for each row of the data, use Symbol as shown below
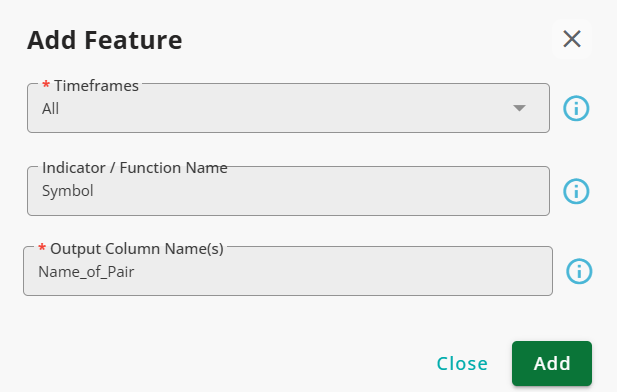
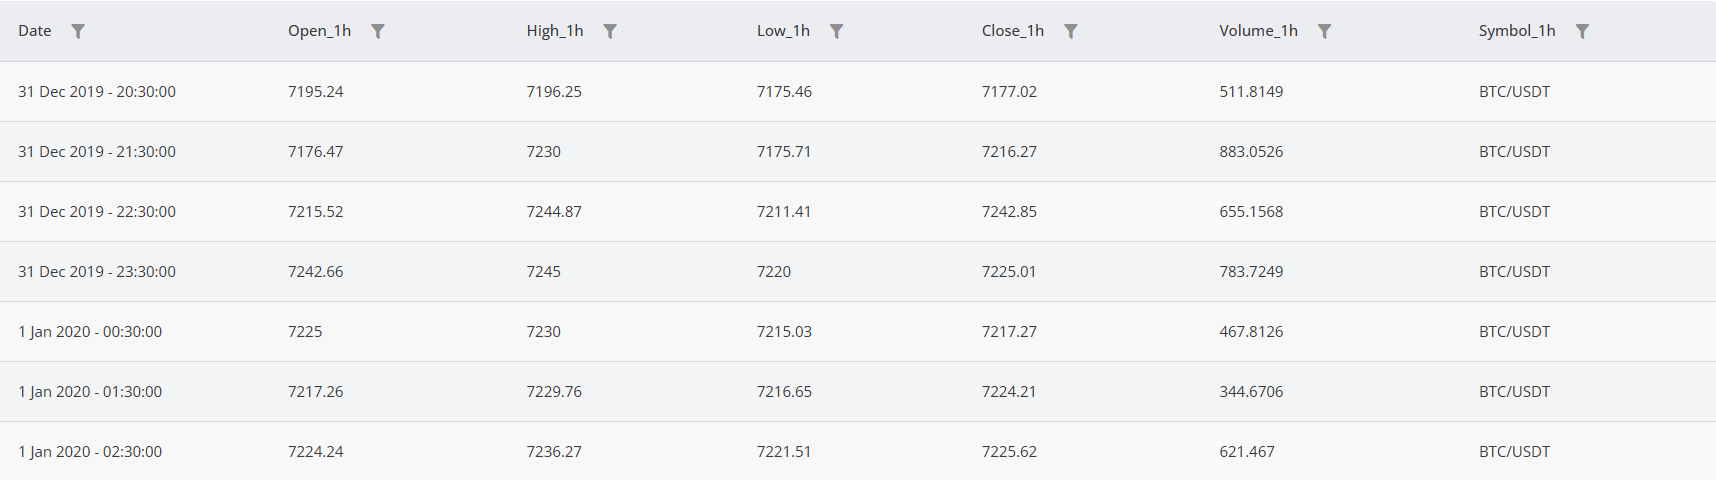
If you check the market data using the Grid option, you can see a column named Name_of_Pair that its value is equal to the name of the asset.
Advanced Quant Wrapper Functions
The functions below are composed from the same underlying building blocks as the rest of this page (Position, Advanced Position, Cross, Diameter, Mix, Majority, Memory, and so on) into higher-level, ready-to-use labeling patterns, so you don't have to chain the individual primitives together by hand every time. Several of the most useful ones are also pinned to the Popular section of the Manual Signal Builder's modifier picker.
Distance Label
Distance Label buckets the normalized distance between two features into named zones — a ready-made version of feeding Diameter into Advanced Position with a single call.
Field | Description |
|---|---|
First Feature | The first feature in the comparison. |
Second Feature | The second feature in the comparison. |
Thresholds | The distance threshold(s) that separate the zones, from smallest to largest. Defaults to 0.4, 1.5. |
Interval Names | The label for each zone, ordered from the largest-distance zone to the smallest-distance zone — e.g. the default far, not far not near, near means "far" applies above the largest threshold and "near" applies below the smallest one. |
Startup Candles | The warm-up period used internally by Diameter. Defaults to 450. |
Example
With the default settings, Distance Label applied to close and a 50-period moving average produces near whenever price is trading close to the moving average, not far not near at a moderate distance, and far when price has stretched well away from it.
Two Line Relation Group
Two Line Relation Group reports a full relationship summary between two features in one step — a generalized version of the relational part of Moving Average Group that works for any pair of features, not just price versus a moving average.
Field | Description |
|---|---|
First Feature | The first feature (e.g. price). |
Second Feature | The second feature (e.g. a moving average). |
Startup Candles | The warm-up period used internally by Diameter. Defaults to 450. |
Distance Thresholds | The distance threshold(s) used to bucket how far apart the two features are. Defaults to 0.4, 1.5. |
Distance Interval Names | The label for each distance zone, ordered largest-distance to smallest — see Distance Label. |
Majority Window Length | The window length used for the position-majority output. Defaults to 20. |
Majority Window Length Threshold | The vote-share threshold required for the position-majority output. Defaults to 0.7. |
The outputs of the function are reported in the following columns.
Output | Description |
|---|---|
Position | Whether the First Feature is above or below the Second Feature. |
Distance | The normalized distance between the two features (numeric). |
Distance Label | The bucketed distance label — see Distance Label. |
Cross | The result of applying Cross to the two features. |
Spread Slope | Whether the gap between the two features is widening, narrowing, or flat. |
Position Majority | The result of applying Majority to the Position output. |
Example
Applied with First Feature set to close and Second Feature set to a 50-period moving average, Two Line Relation Group answers in one step what would otherwise take several separate functions. Position reports whether price is above or below the average and Cross marks the candles where it changes sides, exactly as Cross would. Distance is the normalized gap between the two, which Distance Label buckets into near, not far not near and far. Spread Slope reports whether that gap is widening, narrowing or flat from one candle to the next. Position Majority reports above or below only when that side held for at least 70% of the last 20 candles, and other when neither side was that dominant.
Oscillator Group
Oscillator Group reports a full zone/state summary for a bounded oscillator (e.g. RSI, Stochastic) in one step — overbought/oversold zone, midline behavior, slope direction, and regime persistence.
Field | Description |
|---|---|
Oscillator | The oscillator feature (e.g. an RSI column). |
Overbought Level | The threshold above which the oscillator is considered overbought. Defaults to 70. |
Oversold Level | The threshold below which the oscillator is considered oversold. Defaults to 30. |
Midline | The oscillator's neutral midpoint. Defaults to 50. |
Majority Window Length | The window length used for the zone-majority output. Defaults to 14. |
Majority Window Length Threshold | The vote-share threshold required for the zone-majority output. Defaults to 0.7. |
Memory Window Length | The window length used for the zone-memory output. Defaults to 5. |
The outputs of the function are reported in the following columns.
Output | Description |
|---|---|
Zone | overbought, neutral, or oversold, based on the Overbought/Oversold Levels. |
Midline Cross | The result of applying Cross between the oscillator and the Midline. |
Midline Position | Whether the oscillator is above midline or below midline. |
Slope | Whether the oscillator is rising, falling, or flat bar-to-bar. |
Zone Majority | The result of applying Majority to the Zone output. |
Zone Memory | The result of applying Memory to the Zone output, ignoring the neutral zone — i.e. it remembers the last overbought/oversold reading until a new one occurs. |
Example
With the default settings, Oscillator Group applied to an RSI column reports overbought whenever RSI is above 70, oversold whenever it is below 30, and neutral in between — the same zone convention traders already use for RSI, now available as ready-made columns alongside midline-cross and short-term-persistence signals in a single step.
Qualified Cross
Qualified Cross reports a cross between two features, but only counts it as meaningful when a third, "zone" feature confirms the direction — for example, only treating a moving-average cross as bullish if a longer-term trend feature also agrees.
Field | Description |
|---|---|
First Feature | The first feature in the cross. |
Second Feature | The second feature in the cross. |
Zone Reference | The feature used to confirm direction (e.g. a longer-term trend line or oscillator). |
Zone Threshold | The threshold the Zone Reference is compared against to decide bull/bear zone. Values above it are the bull zone, values below it are the bear zone, and a value exactly equal to it is neutral. Defaults to 0. |
The output column contains three labels:
qualified bullish cross: First Feature crossed over Second Feature while Zone Reference was above the Zone Threshold.
qualified bearish cross: First Feature crossed under Second Feature while Zone Reference was below the Zone Threshold.
unqualified: any other combination, including a cross whose direction disagrees with the zone.
The Zone Reference is read on the same candle as the cross itself; the function does not look back over a window to decide the zone.
A cross qualifies only when the Zone Reference is on the matching side of the Zone Threshold: above it for a bullish cross, below it for a bearish one. This mapping is fixed and cannot be reversed from the settings, so the function always expresses trend confirmation — the cross is accepted only when the Zone Reference already agrees with its direction.
This is worth attention when the Zone Reference is a bounded oscillator. Using an RSI column as the Zone Reference with a Zone Threshold of 50 qualifies a bullish cross only while RSI is above 50, that is, only while momentum is already positive. If you want the opposite, mean-reversion reading — a bullish cross counting only while RSI is below 50 — invert the Zone Reference instead of changing the threshold. Build a 50 - RSI feature with Arithmetic or Advanced Calculator and leave the Zone Threshold at 0. Negative thresholds are accepted as well, so a Zone Reference of -RSI with a Zone Threshold of -50 gives the same result.
Example
To take a 10/20 moving-average cross only when the longer-term trend agrees, set First Feature to sma_10, Second Feature to sma_20, and Zone Reference to the Normalized Slope of a 200-period moving average, leaving Zone Threshold at 0. A cross over that happens while that slope is positive is reported as qualified bullish cross, while the same cross happening while the 200-period average is falling stays unqualified.
Sequence
Sequence detects a two-step event pattern — whether a second condition occurred within a given number of bars after a first condition occurred.
Field | Description |
|---|---|
First Feature | The feature to check for the first condition. |
First Value | The exact value the First Feature must equal for the first condition to trigger. |
Second Feature | The feature to check for the second condition. |
Second Value | The exact value the Second Feature must equal for the second condition to trigger. |
Within N Bars | How many bars after the first condition the second condition is still allowed to count. Defaults to 5. |
The output column contains two labels:
sequence confirmed: the Second Feature equaled the Second Value within Within N Bars bars of the First Feature having equaled the First Value.
no sequence: otherwise.
Example
To detect "RSI entered oversold, then price crossed back above its moving average within 5 bars", set First Feature to your RSI zone column with First Value of oversold, and Second Feature to a Cross column with Second Value of cross over.
Band Context
Band Context reports how a price (or any feature) sits relative to an upper/lower band pair — percent-of-band position, zone, and upper/lower touch state.
Field | Description |
|---|---|
Price | The feature being measured against the band (e.g. close price). |
Upper Band | The band's upper boundary feature. |
Lower Band | The band's lower boundary feature. |
Majority Window Length | The window length used for the zone-majority output. Defaults to 20. |
Majority Window Length Threshold | The vote-share threshold required for the zone-majority output. Defaults to 0.7. |
The outputs of the function are reported in the following columns.
Output | Description |
|---|---|
Band Position Percent | Where Price sits between the two bands, as a percentage (0% at the Lower Band, 100% at the Upper Band). This output is numeric, not categorical. |
Zone | above band, inside band, or below band. |
Touch Upper | Whether Price is at or above the Upper Band. |
Touch Lower | Whether Price is at or below the Lower Band. |
Zone Majority | The result of applying Majority to the Zone output. |
Example
Applied with Price set to close and the Upper Band and Lower Band taken from a Bollinger Bands indicator, Band Context reports Band Position Percent as where price sits across the channel: 0 at the lower band, 100 at the upper band, below 0 when price trades under the lower band, and above 100 when it trades over the upper one. Zone turns that number into inside band, above band or below band, and Zone Majority reports the zone that held for at least 70% of the last 20 candles. Touch Upper reads touch upper on any candle that reaches or exceeds the upper band, and Touch Lower reads touch lower on any candle that reaches or falls below the lower one.
Confirmed Cross
Confirmed Cross reports a cross between two features, but only counts it if the First Feature is still on the crossed-to side a configurable number of candles later — filtering out one-bar whipsaws. This is a generalized version of Confirmed Break that works for any two features, not just price against a level.
Field | Description |
|---|---|
First Feature | The first feature in the cross. |
Second Feature | The second feature in the cross. |
Confirmation Bars | How many candles after the cross the position is re-checked before the cross counts as confirmed. Defaults to 1. |
The output column contains three labels:
confirmed cross over: the First Feature crossed over the Second Feature Confirmation Bars candles ago, and is still above it on this candle.
confirmed cross under: the First Feature crossed under the Second Feature Confirmation Bars candles ago, and is still below it on this candle.
not confirmed: any other candle, including a cross that did not survive the confirmation delay.
Note that the label is reported on the confirming candle, Confirmation Bars candles after the cross itself, not on the candle where the cross occurred. Only the position on that confirming candle is checked, so the First Feature may have crossed back over the Second Feature in between and returned; the function does not require it to stay on the crossed-to side for the whole period. With the default Confirmation Bars of 1, the label appears on the candle immediately after the cross.
Example
To check that a 10/20 moving-average cross is not a single-candle whipsaw, set First Feature to sma_10, Second Feature to sma_20 and Confirmation Bars to 3. If sma_10 crosses above sma_20 and is still above it three candles later, that third candle is labeled confirmed cross over. If sma_10 has dropped back below by then, no label is produced and the candle stays not confirmed.
Streak Label
Streak Label reports how many bars have elapsed since a feature last equaled a specific value, and buckets that count into named streak-length labels.
Field | Description |
|---|---|
Feature | The feature to track. |
Value | The exact value being tracked "bars since" for. |
Thresholds | The bar-count threshold(s) that separate the streak-length zones, from smallest to largest. Defaults to 5, 20. |
Interval Names | The label for each streak-length zone, ordered from the longest streak to the shortest — e.g. the default long, medium, short means "long" applies above the largest threshold and "short" applies below the smallest one. |
The outputs of the function are reported in the following columns.
Output | Description |
|---|---|
Bars Since | The exact number of bars since the Feature last equaled the Value (numeric). |
Streak Label | The bucketed streak-length label, using Interval Names. |
Example
To measure how long it has been since the market was last overbought, set Feature to an RSI zone column, such as the Zone output of Oscillator Group, and Value to overbought. With the default Thresholds of 5 and 20, Bars Since counts the candles elapsed since the last overbought reading, and Streak Label reports short for the first five candles after it, medium while the count sits between 5 and 20, and long once more than 20 candles have passed without one.
Pattern Context
Pattern Context builds a fuller trading context around a set of candlestick pattern columns — which side (bullish/bearish) the pattern is on, how large the triggering candle is relative to recent volatility, whether it's backed by volume, whether it agrees with a trend feature, and whether the next candle confirms it.
Field | Description |
|---|---|
Candle Patterns | One or more Candle Pattern columns to evaluate together (see Candle Patterns). |
Trend Feature | A categorical column using bull/bear labels (e.g. Moving Average Group's MA Condition) that the pattern's direction is compared against for the alignment output. |
ATR Window Length | The window length used to measure recent volatility (candle range) for the size-vs-volatility output. Defaults to 14. |
Volume MA Window Length | The window length used for the volume baseline the volume-confirmation output is compared against. Defaults to 20. |
The outputs of the function are reported in the following columns.
Output | Description |
|---|---|
Pattern Side | bull if a bullish pattern fired, bear if a bearish pattern fired, mixed if patterns fired in both directions on the same candle, or middle if none fired. |
Pattern Size vs Atr | Whether the triggering candle's range is large, normal, or small relative to recent volatility. |
Volume Confirmation | Whether volume on the triggering candle was confirmed (at or above its recent average) or unconfirmed. |
Pattern in Trend Direction | aligned if the Pattern Side agrees with the Trend Feature's own bull/bear reading, not aligned otherwise. |
Pattern Confirmed Next Bar | confirmed if the following candle moved in the same direction as the pattern, not confirmed otherwise. |
Example
Applied with Candle Patterns set to a group of candlestick-pattern columns and Trend Feature set to a column that labels the trend as bull or bear — the MA Condition output of Moving Average Group is meant for this — Pattern Context describes each detected pattern instead of merely flagging it. Pattern Side reports bull, bear, mixed when bullish and bearish patterns fire on the same candle, and middle when none fire. Pattern Size vs Atr compares the candle's range against its recent average to report small, normal or large, and Volume Confirmation reads confirmed when the candle's volume is at or above its 20-period average. Pattern in Trend Direction reports aligned only when the pattern's side matches the trend feature, and Pattern Confirmed Next Bar looks at the candle after the pattern and reports confirmed when it closed in the pattern's direction.
Level Interaction
Level Interaction reports how a price interacts with a fixed or dynamic level over time — approach, touch, break, and how often the level has recently been tested. Useful for support/resistance-style analysis around a specific price line.
Field | Description |
|---|---|
Price | The feature being checked against the level (e.g. close price). |
Level | The level feature (e.g. a support/resistance line, pivot, or moving average). |
Touch Tolerance (%) | How close Price must be to the Level, as a percentage of the Level's value, to count as a touch. Defaults to 0.1. |
Touch Count Window Length | The trailing window used to count recent touches. Defaults to 100. |
The outputs of the function are reported in the following columns.
Output | Description |
|---|---|
Interaction | touch (price is within tolerance of the level), break above, break below, or approach (none of the above). |
Position | Whether Price is above or below the Level. |
Touch Memory | The result of applying Memory to the touch state, so a recent touch is "remembered" for a few bars — a simple retest signal. |
Touch Count | The number of touches within the trailing Touch Count Window Length bars (numeric). |
Example
To study how price behaves around a support level, set Price to close and Level to the level column, leaving Touch Tolerance (%) at 0.1. Any candle whose close is within 0.1% of the level counts as a touch, so Interaction reports touch on those candles, break above or break below when price crosses the level from further away than the tolerance, and approach on any other candle, including one that touches the level and crosses it at the same time. Touch Memory keeps the touch visible for the five candles that follow, which is what makes a retest easy to spot, and Touch Count reports how many touches have occurred in the last 100 candles.
Confluence Score
Confluence Score combines several already-categorical signals into a single weighted bullish/bearish score and label — useful for requiring multiple independent signals to agree before treating a setup as strong.
Field | Description |
|---|---|
Features | The categorical feature columns to combine (e.g. several Position, Cross, or Oscillator Group Zone columns). |
Weights | The weight given to each feature, in the same order as Features. Defaults to equal weight for every feature. |
Bullish Values | The label value(s), across all of the selected Features, that count as bullish. Defaults to bull, bullish, up, confirmed cross over. |
Bearish Values | The label value(s), across all of the selected Features, that count as bearish. Defaults to bear, bearish, down, confirmed cross under. |
Confluence Threshold | How far the bull/bear score must separate before the label output commits to bullish or bearish rather than "no confluence". Defaults to 0.5. |
The outputs of the function are reported in the following columns.
Output | Description |
|---|---|
Bull Score | The weighted share of the selected Features currently reading a Bullish Value, from 0 to 1 (numeric). |
Bear Score | The weighted share of the selected Features currently reading a Bearish Value, from 0 to 1 (numeric). |
Confluence Label | bullish confluence or bearish confluence once the net score clears the Confluence Threshold in that direction, otherwise no confluence. |
Example
To combine several signals into a single verdict, set Features to a list of categorical columns — for example the MA Condition of Moving Average Group, the Pattern Side of Pattern Context, and a Confirmed Cross column. Each feature holding one of the Bullish Values adds its weight to Bull Score, each holding one of the Bearish Values adds to Bear Score, and both scores are normalized so that 1 means every feature agreed. With the default Confluence Threshold of 0.5, Confluence Label reports bullish confluence when the bull score exceeds the bear score by more than 0.5, bearish confluence in the mirror case, and no confluence otherwise.
The three columns above suit the default lists, which match bull, bullish, up and confirmed cross over against bear, bearish, down and confirmed cross under. The comparison is by exact value, so a feature labeled with anything else contributes nothing until you list its own labels. Feeding in the Zone output of Oscillator Group, for instance, requires adding oversold to Bullish Values and overbought to Bearish Values.